Add a training record to your training history
- If you complete training outside of Rival Learn, you can keep a record of it by adding to your training history.
- Examples of outside training may include attending a seminar or webinar, reading books, taking classes, and so on.
- You can upload a document or documents to attach to the training record. Maximum file size for each uploaded document is 5 MB.
- Supported uploaded document file types are pdf, doc, docx, xls, xlsx, ppt, pptx, pps, ppsx, odt, key, jpg, png, gif, and jpeg.
- From the Student Portal navigation bar, click My Training. My Training page opens.
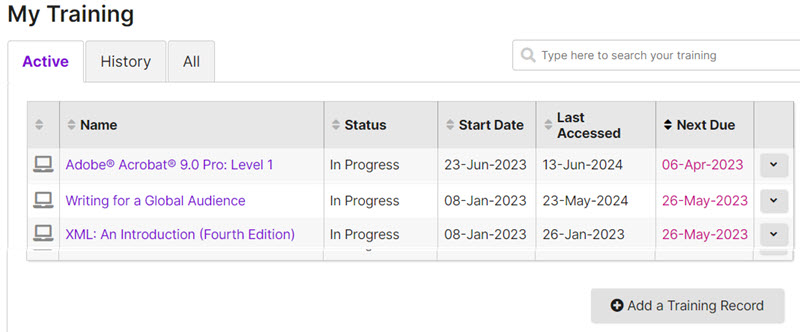 My Training page shows all your training in one place. View your active, mandatory, and historical training records here. You can also:
- Search for specific training
- Launch and complete online courses
- Enroll in in-class courses pushed to you by your supervisor
- Cancel enrollment in in-class courses You can identify the type of training by its icon: When you access this page for the first time, the Active tab is selected by default and active training appears in the data grid. Click other tabs to see historical records or active and historical training records combined. Buttons, links, and options
 Filters the data in the grid based on what you type in the box.
  Click a tab to view training information.
This icon: Represents: 
Assignment 
Online course 
In-class course 
Competency - Active: Shows in-progress (active), scheduled, and upcoming online courses and training.
- History: Shows completed, expired, and canceled training.
- All: Shows all training from the Active and History tabs combined.
- Certificates: Shows all certificates of all content types Note: The selected tab remains the default as you leave this page or log out until you change it.
 (Sort) Click a column heading to toggle the sort order (ascending/descending). You can set a different sort order on each of tab (Active, History, All). The sort order persists as you move from tab to tab or log out until you change it. Name column link Click a link in the Name column to open the Training Details page. From there you can view details about the in-class course or online course and perform various actions.
  (Actions) Click to perform an action. Actions vary based on the training type and whether training is active or historical. Potential actions:
 - Launch: Launches an online course or assignment.
- Remove: Removes a self-registered course from the Training page.
- Details: Navigates to the Training Details page.
- Prerequisites: Navigates to the Prerequisite section on Training Details page.
- Schedule: Navigates to the In-Class Courses section on Training Details page.
 Click to add a training record to your training history.
- Click the Active, History, or All tab.
- Click Add a Training Record. The Add Record page opens.
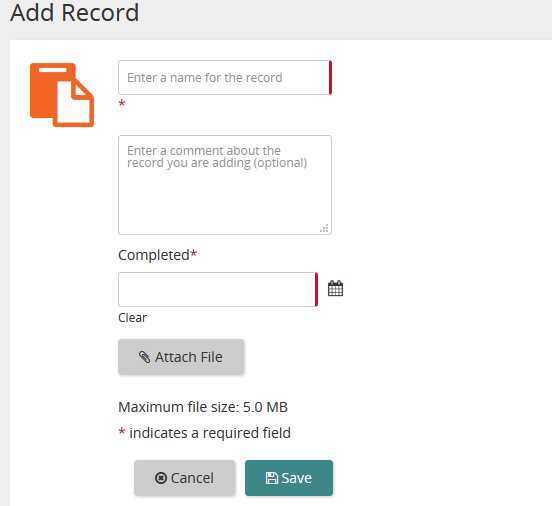 Students use this page to add any training received outside of Rival Learn so that it becomes part of their training history. Fields Enter a name for the record In this box, enter text to describe the type of training accomplished. Enter a comment In this box, enter a comment to describe the training record and provide useful details. Completed Click the calendar icon and then select the date the training was completed. Opens a File Upload box so you can browse and select a document to attach to the training record. Currently supported file types are doc, docx, gif, key, jpg, jpeg, odt, pdf, png, ppt, pptx, pps, ppsx, xls, and xlsx. The maximum file size cannot exceed 5.0 MB.
Tip: Click Clear to clear date and select another one.
Attach File
- Enter a name for the training you accomplished.
- Enter comments to describe the training.
- Select the date you completed the training.
- (If applicable) Complete any custom fields.
Note: Custom fields only appear if your administrator added them via the Administration Portal (Enterprise>Configuration>Custom Fields).
- (If applicable) Click Attach File. Browse and find the document and then double-click to select it.
Tip: To attach multiple files, repeat step 8 for each document you want to upload.
- Click Save.