Check out and pay for your shopping cart items
Note: This topic assumes you have added course catalog items to your shopping cart and you are ready to pay for them.
- In the Course Catalog, click the shopping cart icon.
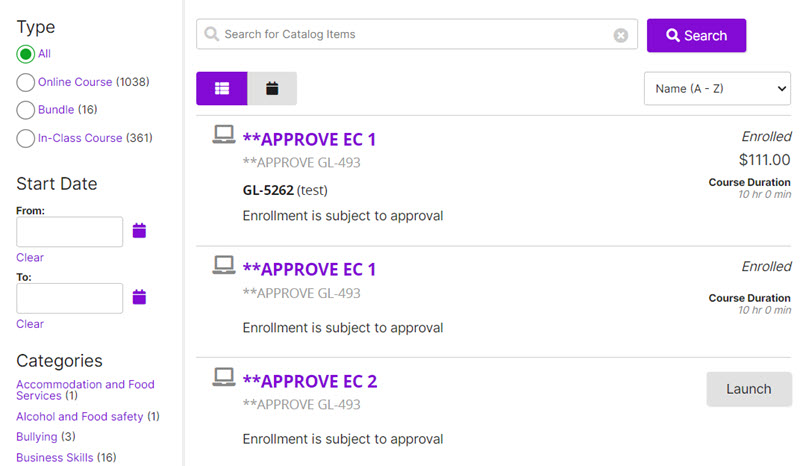 The Course Catalog contains course catalog items that you can select for your training needs. When you open it, all catalog items appear in the results panel. Every catalog item based on your membership criteria, from A to Z, is shown. Searching To find a specific course catalog item, enter a keyword or keywords in the search box. Search results are displayed by relevance. Most relevant search results appear at the top of the list. Relevance is based on how closely a keyword matches and which field is queried. An all word or exact match in a title field is listed before an all word or exact match in a description. Partial word matches rank lower and appear later in the list. Example: If you search for Excel, course catalog items with Excel in the title appear first followed by items with Excel in the description. Catalog items containing the word, excellent, in the title or description appear later in the list. You could further limit the search by adding Microsoft as a keyword. Results with Microsoft Excel in the title appear first, then description, and so on. You can sort the catalog by name, product code, and price. Name sort (A-Z) is the default. You can filter by:
Tip: The search process does not currently support quotes. Do not type quotes when searching.
Sorting
Note: Relevance becomes the sort order when you type keywords in the search box.
Filtering
- Type
- Category
- In-Class Course date For type and category, filtering is dynamic, which means available formats and categories vary depending on the search results. For example, if your catalog includes in-class courses, online courses, and bundles, you can filter by those types. If your catalog items are defined with categories, you can filter by those types. The number in parenthesis beside a filter indicates the number of results for that filter. Navigating Results panel The results panel (right side of page) shows course catalog items. You can easily tell what type of item it is by the icon. Each course catalog item title is a hyperlink. Click it to see details such as product code, course description, syllabus notes, course outline, materials, and more. Action buttons Shopping cart icon
 If you have selected catalog items for purchase, the shopping cart icon appears at the top of the page. The number indicates the number of items in your cart. Click the icon to open the shopping cart. The Shopping Cart opens.
 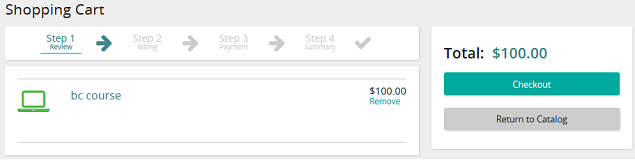 The Shopping Cart lists the course catalog items that you added to your cart for purchase along with the total amount of your purchases. The shopping cart has the following steps or pages:
To filter by: Do this: Type Click an option. Category Click a category link.
Note: The top five most popular categories are shown in order of popularity. To see other available categories, click Show All categories.
In-class Course date You can search the catalog for scheduled in-class courses and filter by date range. Select a start date, end date, or both. (See table below for details.) When you enter a: The Course Catalog shows: --- --- From and To date All courses that fall within the range you specified. From date only All courses with a start date on or after the From date. To date only All courses from the current date up to and including the To date. Scrollbar Click to scroll down and see more catalog item results. 
Click a page number link to move to that page.
Click the arrows to move to previous or next page.
Click the double arrows to move to the first page or last page.
Click to specify how many items to display on a page. (Your page size selection is saved when you navigate away from the course catalog.) This icon: Represents: 
Online Course 
In-Class Course 
Bundle This button: Does this: Add to cart Adds the course catalog item to your shopping cart for purchase. (Only applies to course catalog items with a price.)
Note: This action is only available when eCommerce function is enabled.
Add to My Training Adds the online course to your My Training page. Cancel Enrollment Cancels your enrollment in a class in which you are registered. Remove from Cart Removes a course catalog item from your shopping cart. Schedule Displays the scheduled classes you can choose to enroll in. Subscribe Shows available subscription options on the Details page. - Step 1: Review
- Step 2: Billing
- Step 3: Payment
- Step 4: Summary Step 1: Review This page shows the course catalog items you choose for purchase along with total cost. You can also search for catalog items using the Search for catalog items search box. The typical workflow consists of verifying all the catalog items for purchase are listed and the total purchase price is accurate. After that, you go to the Billing page. You can even return to the course catalog if you are not ready to check out. Step 2: Billing
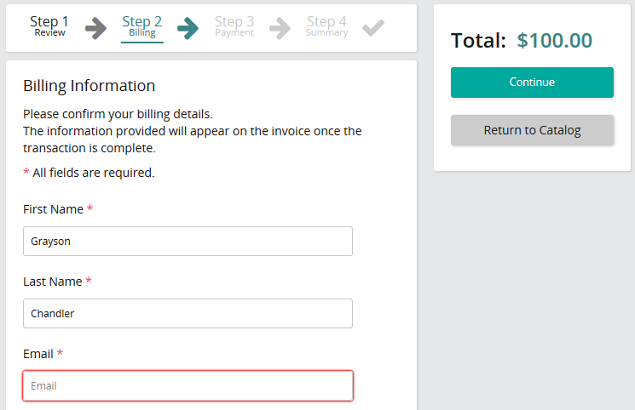 This page shows your billing information. Rival Learn automatically populates fields using information from the Contact Information section in Student Properties (Learning>Plan>Students) if available. Typical workflow consists of verifying billing information and making changes if necessary. After that, you go to the Payment page. You can also return to the review step or course catalog. Step 3: Payment
 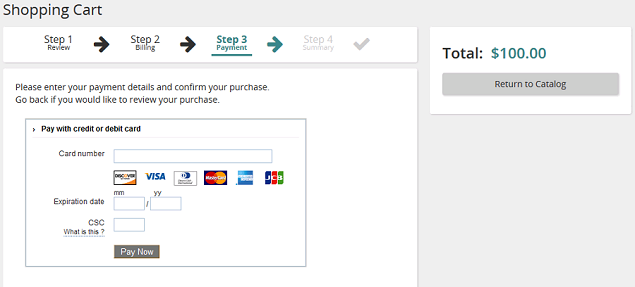 Depending on your site's PayPal account, you may have two payment options: To pay with:
 - PayPal, click the Checkout with PayPal button and proceed.
- Credit card, enter your credit card information, and click the Pay Now button to complete your purchase.
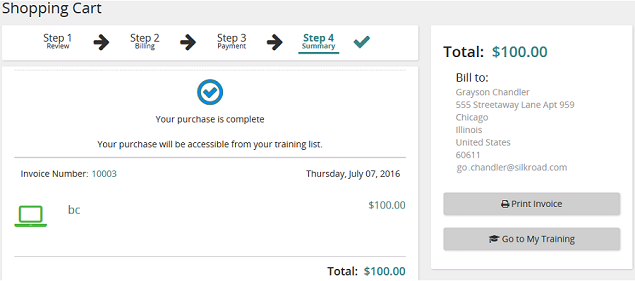 The Summary page is the confirmation of your purchase. You can print an invoice, return to the course catalog, or go to your My Training page.
Tip: You can also go back to previous steps and even return to the course catalog.
Step 4: Summary
- Click Checkout.
- If your billing information is not pre-populated, enter it.
- Verify your billing information.
- Click Continue.
- Enter your payment information and click Pay Now. The Summary page shows a summary of your purchase.
- (Optional) Click Print Invoice to print an invoice for your records.