Integrating Workday with Rival Search
This integration allows Rival Search customers to export prospect or candidate data from Rival Search directly into Workday. Through the integration, Workday users can get detailed resume data on the prospects or candidates they sourced through Rival Search.
To achieve this objective, Rival Search must be able to retrieve a list of available job requisitions from Workday and write a candidate data into Workday, using standard web services provided by Workday.
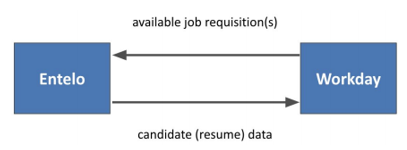
At a high level, Rival Search imports into Workday data fields related to a person’s resume including fields such as:
- Full Name
- Location
- Education
- Work History
- Email Address
- Skills
- Social Links
Note that some prospects or candidates only have a few of the fields listed above.
The integration is triggered by the user via the Rival Search platform. Once the integration is enabled, users can click Export to Workday on an Rival Search profile page, which triggers an import into Workday of that specific profile.
The integration cycle runs once per candidate import. A typical recruiter might import between one and 10 candidates per day into Workday from Rival Search.
System Requirements
| Browser | Support Version(s) |
|---|---|
| Internet Explorer | IE version 10 or newer |
| Google Chrome | Version 50 or newer |
| Microsoft Edge | Version 40 or newer |
| Firefox | Version 50 or newer |
| Safari | Version 10 or newer |
Transport Protocols and Authentication
All web service calls to the Workday web service from Rival Search are invoked using the Workday integration user credentials setup on the Rival Search platform. All such requests are made using https to ensure that the transport is secure. Once Workday receives the request it authenticates the credentials for the integration user, verifies that the user has the appropriate security for the web service before allowing the request to be processed.
If the credentials are not correct or the integration user does not have appropriate security then Workday would send back an error message in the response indicating that the request was rejected, and Rival Search will display an error to the user, telling the user that the export has failed.
Workday Configuration
Creating the Integration System User
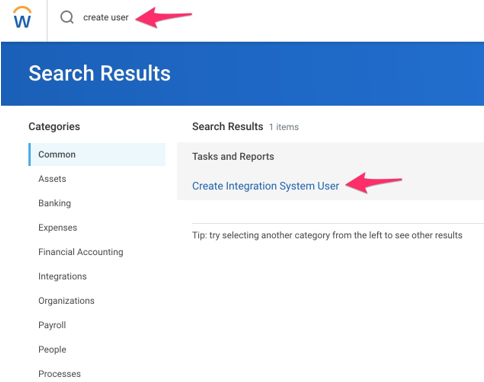
An Integration System User (ISU) is required for this integration. This user must have specific security groups assigned to it (see below). Rival Search will connect to Workday as this user in order to send and receive the necessary information.
- Create ISU:
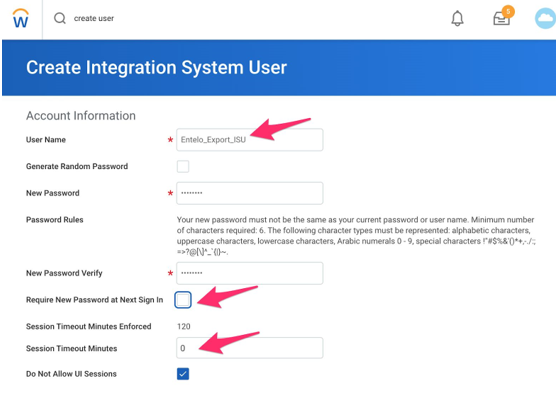
- Define username, password, and other attributes:
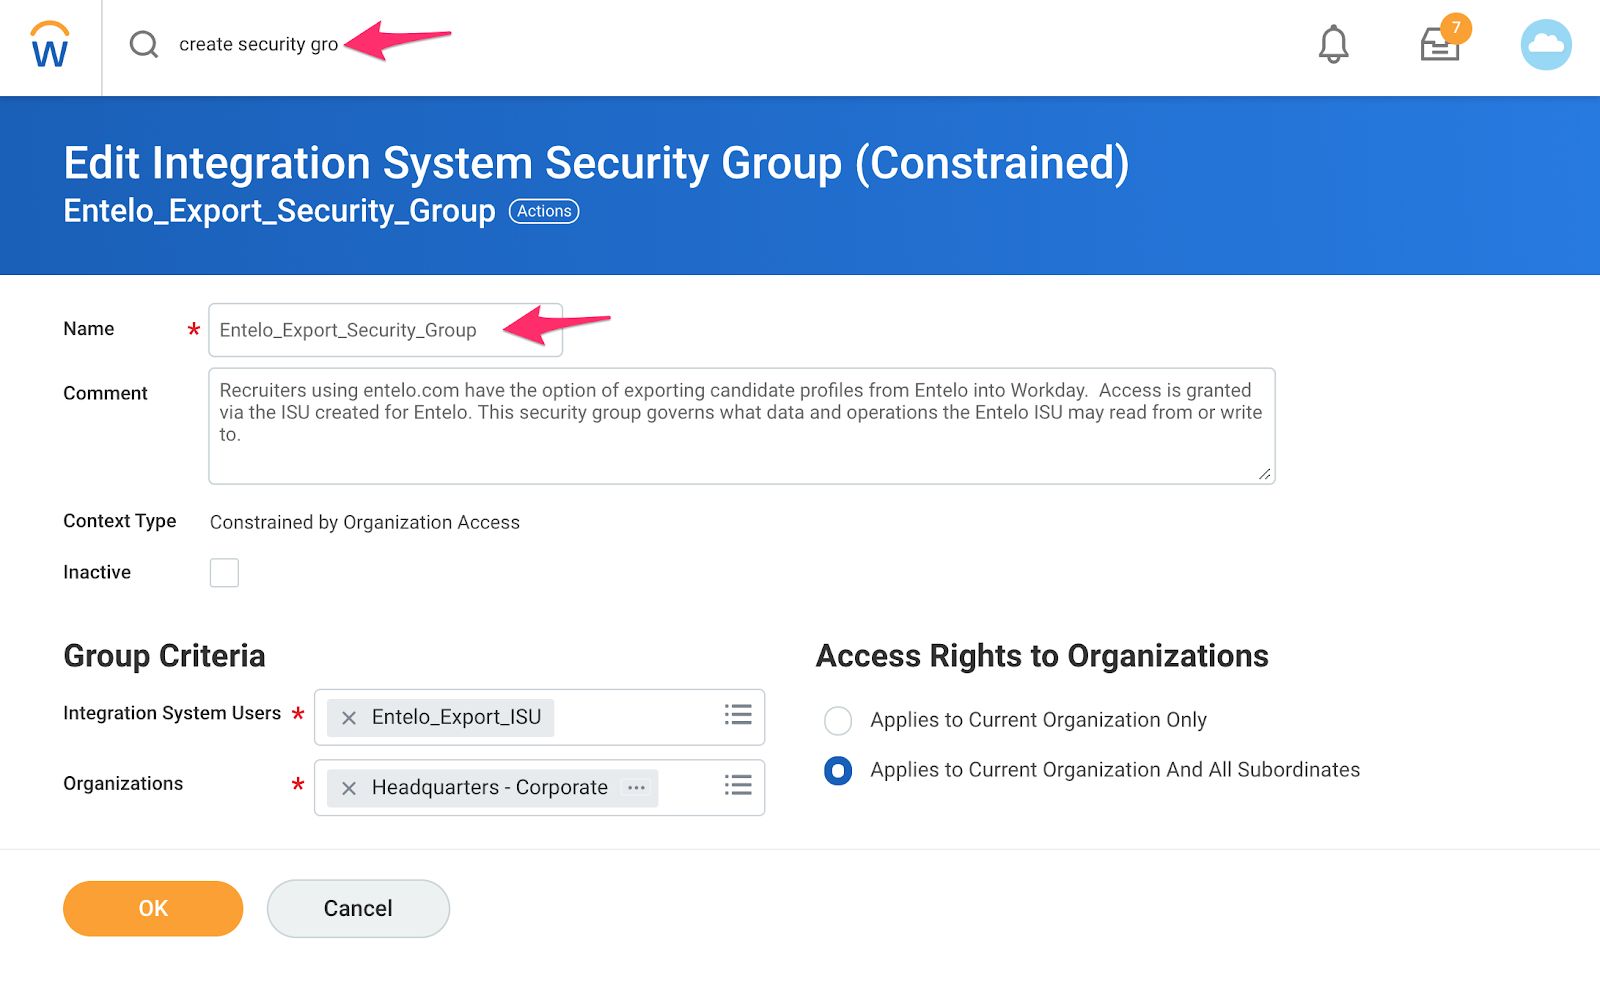
Creating the Integration Security Group (ISG)
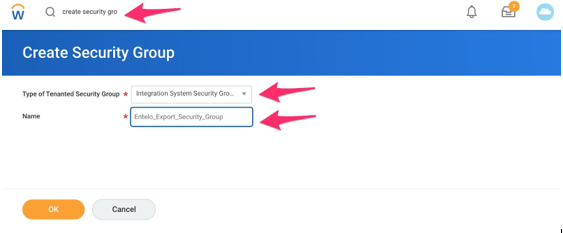
Next create a security group for the above user, which will allow you to govern what data Rival Search can read/write to Workday.
- Create ISG:
- Associate the new security group with the ISU created earlier:
Associating Domains with Security Groups
You can now associate the following Domain Security Policies with your SG:
| Operation | Domain Security Policy | Domain Security Policies Inheriting Permission | Functional Areas |
|---|---|---|---|
| GET, PUT | Job Requisition Data | Pre-Hire Process | |
| GET, PUT | Candidate Data: Job Application | Candidate Data: Assessment Results Candidate Data: Eligibility Results Candidate Data: Interview Feedback Comments Candidate Data: Interview Feedback Results Candidate Data: Offer Details Candidate Data: Quick Stats Candidate Data: Sharing | Recruiting |
- In Workday search for "Maintain Permissions for Security Group"
- Click on the 2nd result
- On the "Maintain Permissions for Security Group" page, under operation select the option "Maintain", and under "Source Security Group" find the Security Group you created for the integration.
- Press "OK"
- On the next page, you will see Domain Security Policy Permissions, you will need to click the "+" sign twice to add the 2 permissions in the above spreadsheet.
- Please, add the above data from the spreadsheet to the boxes in Workday. Normally all you need to do is add the Operation (View/Modify Access) and Domain Security Policies Inheriting Permission (Domain Security Policy)
- Click "OK", and then "Done".
It is our recommended process to test this integration with a Workday test tenant first so you might need to create an ISU for the test tenant and then the 2nd ISU for the production tenant.
Note: When making any Security Policy Changes in Workday you need to Activate them. You can do this by Searching "Activate Pending Security Policy Changes" in Workday, clicking on the first result, and activating it from there.
Retrieving the Workday Web Services (WWS) WSDL
The ISU account created above will be used to request data from and send data to your Workday tenant via its WWS endpoint. The location of your WWS endpoint (along with other metadata) is defined in your WSDL. The following Workday Community document shows how to find the address of your WSDL, which needs to be provided to Rival Search along with your ISU credentials:
- In Workday, search for "Public Web Services" and click on the first result.
- Hover over the Web Service named Recruiting (Public) until you see the 3 dots.
- Click the 3 dots, Web Service > View WSDL
- On the page that opens, scroll to the very bottom, and look for the link after <soapbind:address location=", copy that link and add ?wsdl to the end of it, if it is not already there.
- We recommend validating the WSDL URL by visiting it in your browser. You should see an XML file similar to the following: https://wd2-impl services1.workday.com/ccx/service/entelo_pt1/Recruiting/v28.1?wsdl
Creating an Applicant Source ID
- Search for Maintain Recruiting Sources
- Click on the Maintain Recruiting Sources task
- Click the + button under the number of items at the top to add a new row
- Set the Name of the row to "Entelo"
- In the row, click the + button to the right of the Inactive column to add a new source for the row
- Enter "Entelo" for the Source
- Click the OK button at the bottom to update the recruiting sources
Finding the Recruiting Source ID
You will need to find the ID of the recruiting source that you just created so that it can be used in Rival Search API calls. After clicking OK in the last of the steps outlined above, you should now see all of your recruiting sources listed, including the new Rival Search recruiting source.
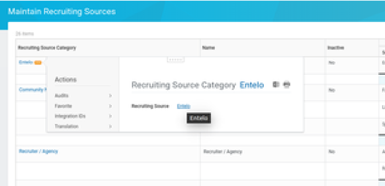
- Hover your mouse over the Rival Search recruiting source. An ellipses button should appear
- Click on the button, and a popup will appear. On the right side of the popup, it should read "Recruiting Source Category Entelo." Under it, you'll see "Recruiting Source Entelo." Click on the blue Entelo link next to the Recruiting Source to view the recruiting source
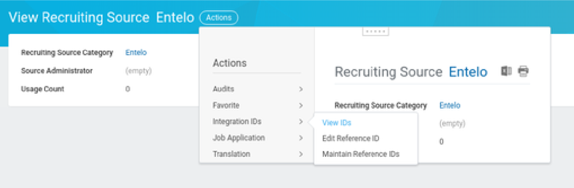
- On the Rival Search recruiting source page, click Actions>Integration IDs>View IDs
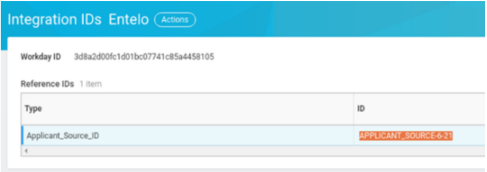
- The next screen will display a table with two columns: Type and ID. Look for the row with the Applicant_Source_ID type and copy the value in the ID column of that row. That is the Integration ID you should use for Rival Search.
Rival Search Configuration
Our Customer Success team is happy to complete the Rival Search side of the integration for you. You can also complete the integration yourself using the following instructions.
- Sign in to entelo.com as an organization admin.
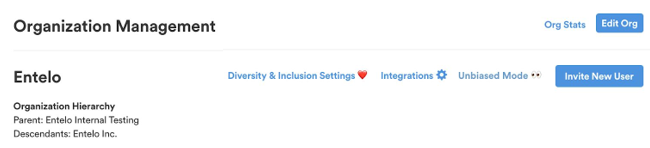
- Navigate to the dropdown menu at the top right corner of the navbar. Select "Organization Management" and click on the "Integrations" link on the next page.
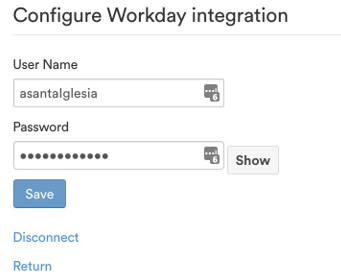
- On the Integrations page, select "Add Workday", which should take you to the following screen where you can add in the ISU that you’ve created:
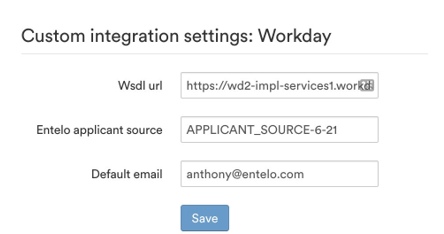
- Go to "Custom settings" link in the "Manage Integration" page, and input three pieces of information:
- WSDL URL
- Applicant Source ID
- A default email address, which Rival Search will use for candidate imports whenever the email address is not available.
- Click "Save".
Customer/User Acceptance Testing
Any Rival Search user familiar with the platform can perform the following integration test. We recommend testing this integration in your test tenant before integrating into your production tenant. A simple and sufficient test sequence is:
- Sign in to Rival Search using your Rival Search credentials (entelo.com)
- Perform a candidate search on Rival Search
- Select a profile from the search result page and export the profile to Workday
- To export, click to view the profile, then in the "Actions" drop-down, click the "Export to Workday" button, and select an appropriate Workday job to export to
- If you do not see the "Export to Workday" button, you might not have configured the integration properly. In that case, you can reach out to Entelo’s Customer Success team.
- Find and view the candidate directly in Workday to confirm that the export was successful
- Repeat steps a to d with a different Rival Search profile to further verify the integration
Once you've confirmed that the exports are successful, update your Rival Search configuration with your production Workday tenant.
Workday Tenant
Workday recommends performing user acceptance tests in either an implementation or Sandbox tenant. Preview tenants are NOT recommended as they are subject to frequent changes and may include functionality not available in Production.
Imported Functionality
We do not collect candidate information from Workday.
Reference Material
| Reference / Location | Description |
|---|---|
| Creating a Recruiting WSDL | A Workday document describing the process of creating a Recruiting WSDL for this integration (Section Retrieving the WWS WSDL). |
| Adding Rival Search as a recruiting source in Workday | An Rival Search document that describes the process of generating an Applicant Source ID. |
Frequently Asked Questions
Do I need to configure this integration for all users in my organization?
No, the integration only needs to be configured once and all users in our organization can benefit from it.
How many users can I support with this integration?
There are no limits to the number of users that can be supported on this integration.
Why am I not seeing the "Export to Workday" button on a Rival Search profile?
If this is the first time configuring the integration, you might be missing some configuration fields, so the integration is not set up properly.
If the integration has worked in the past but is no longer working, it is likely an issue with the ISU credentials. Check to see if you’ve changed the password for the ISU and input the new password in Rival Search.
How do I export a profile as a prospect versus a candidate?
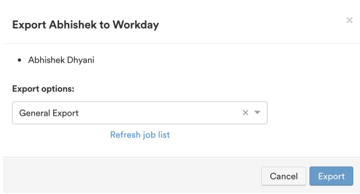
To export a profile as a prospect, select the "General Export" option in this confirmation screen that should show up when you click on the "Export to Workday" button.
How often are the job requisitions updated on Rival Search?
We automatically pull job requisitions from Workday 4 times a day (every 6 hours) but you can trigger a manual refresh by clicking the "Refresh job list" link in the export confirmation screen seen above.