How to Set Up a Journey
Overview
The Journey Builder is a guided process for creating a Journey. The steps for the Journey Builder are broken down by:
- Setting up Journey Settings
- Setting up Journey Triggers
- Setting up Stage Messaging
- Reviewing & Confirming Journey
Setting up Journey Settings
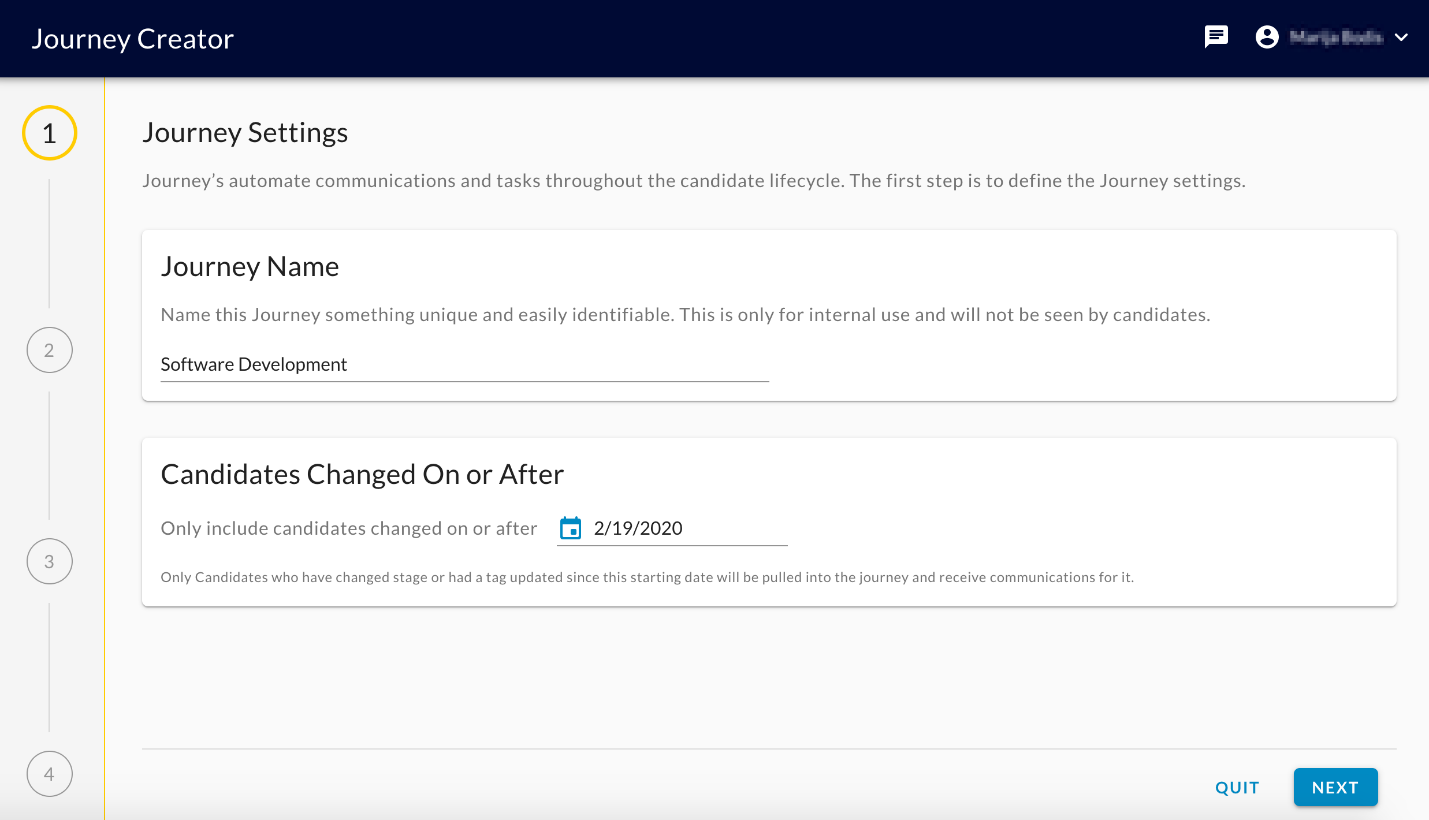
The first step is to define the Journey settings. In this step, you will be able to define the journey name (which is required to be unique) and to set the date since only candidates who have changed stage or had a tag updated will be pulled into the journey and receive communications for it.
Setting up Journey Triggers
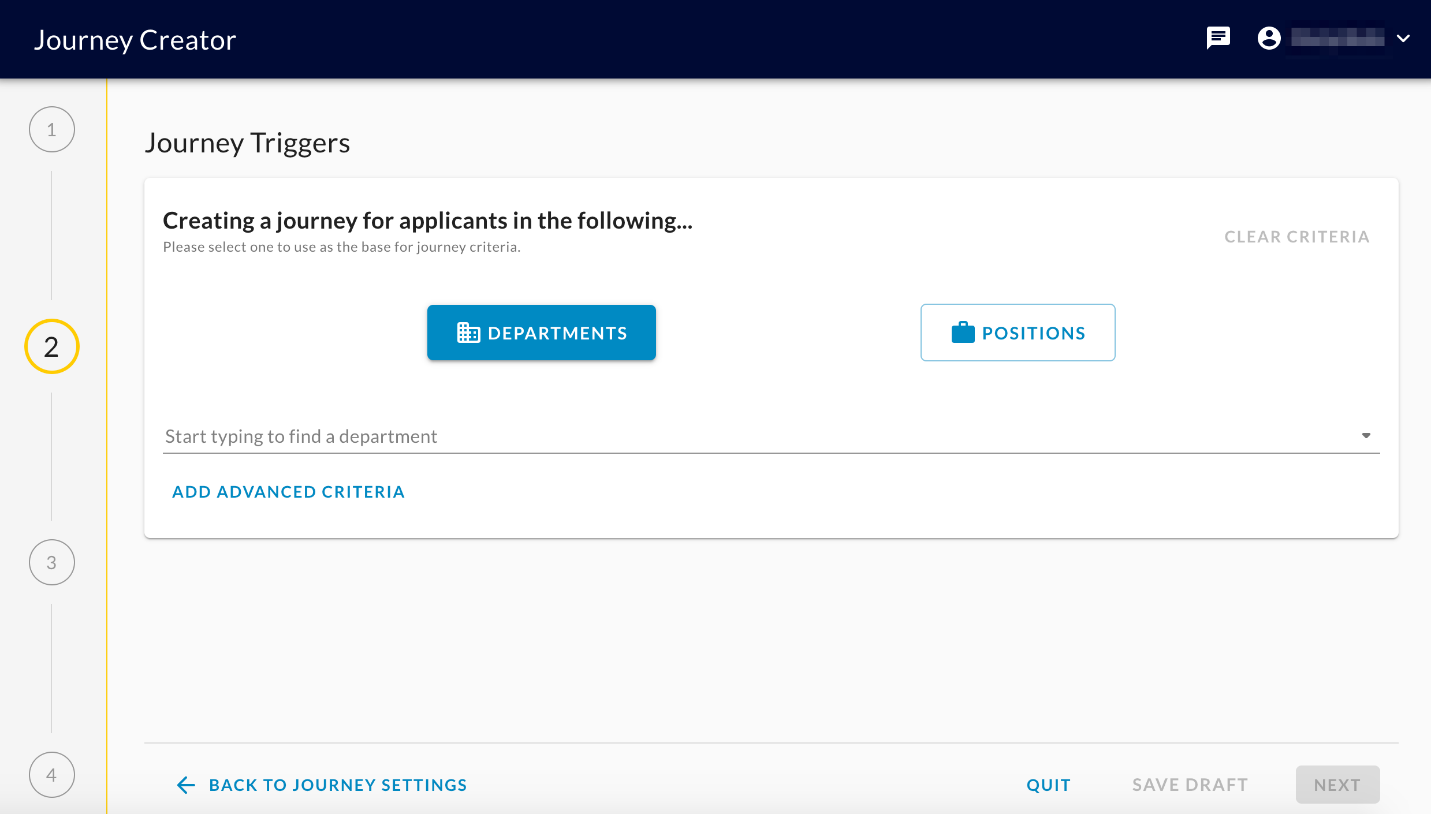
Journey triggers are used to indicate the conditions that must be met for a candidate to be added to a journey. A journey can be set up with either of the following types of conditions:
- Department conditions: Candidates that apply to jobs in the specified departments are added to the journey
- Position conditions: Candidates that apply to jobs in the specified positions are added to the journey
Creating a journey for...
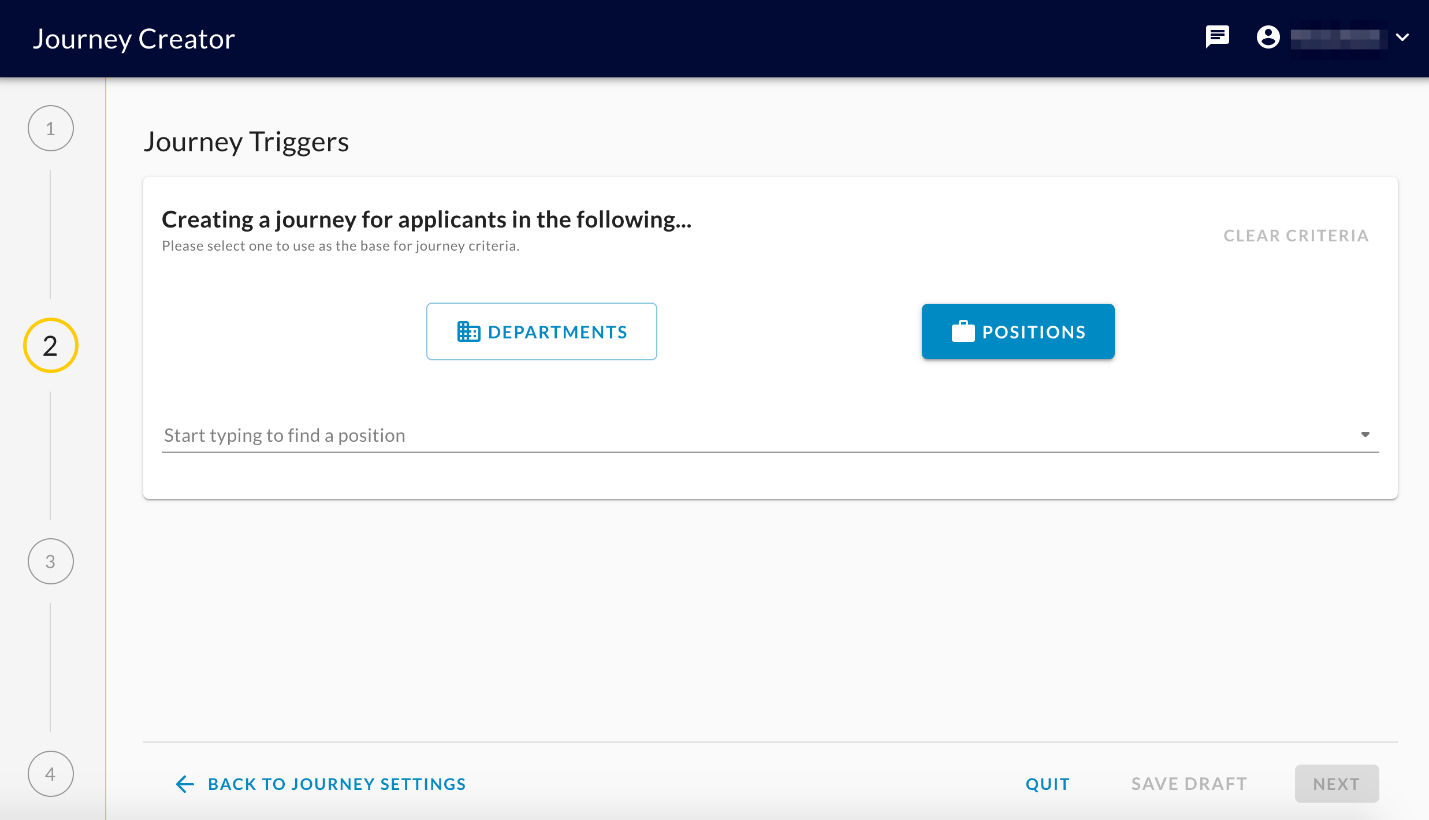
The user selects to create a journey for departments or positions by clicking on the appropriate icon.
Primary Triggers
- Once the type of journey is selected (Departments or Positions), the user will then select to add specific departments or positions using the typeahead search.
- Departments or positions will be added as "chips" once selected.
- There is advanced criteria if a department is chosen (Position is NOT,Position name exactly matches,Position name contains,Position name does NOT contain,Position location is,Position location name contains)
- Clicking on the "x" icon removes a selected department or position from the list.
Clear Criteria
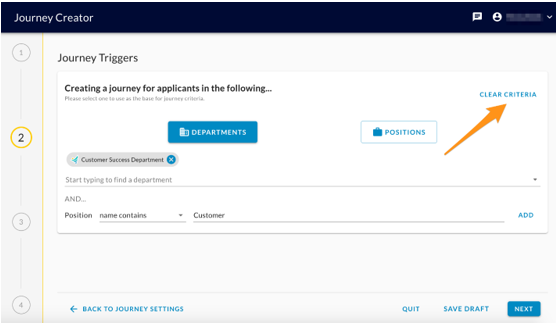
Once trigger criteria have been added to the form, users have the option to clear all trigger criteria and start over. The user clicks the "Clear Criteria" link and the following confirmation dialogue appears:
- Clicking "Clear" will remove all added trigger criteria from the form
- Clicking "Cancel" will keep all added trigger criteria in the form.
Switch Journey Type
The user would click on the following toggle to switch between a "Department" context or "Position" context for setting up journey trigger criteria.
Clicking the toggle will display the following popup asking the user to confirm the change.
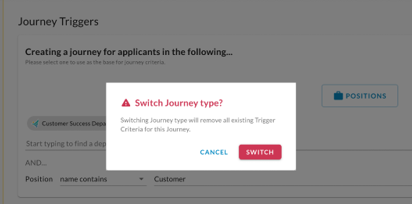
Once the changes are confirmed, all existing trigger criteria are then removed from the form.
Quit
Clicking on the "Quit" button in the footer brings up the following confirmation dialogue.
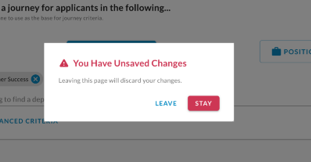
- If the dialogue is confirmed, all changes are lost, and the user is navigated back to the Journey List page.
- If the dialogue is canceled, no changes are lost and the user remains on the page.
- NOTE: This dialogue does not appear when on the initial step of the Journey Builder process ("Creating journeys for..."). The user is immediately navigated back to the Journey List page.
Save Draft
Users will be able to start building a journey and then save a draft version while in the middle of the process of creating a Journey. The "Save Draft" option is available and enabled when at least one trigger criteria have been added to the journey.
- Users will be asked to provide a name in order to save the journey (the name is required and must be unique) and change the "Candidates Changed On or After" date if necessary (this date is by default set to today's date).
- After clicking "Next", Journey Triggers will appear. Once the department or position are chosen, "SAVE DRAFT" button will become enabled.
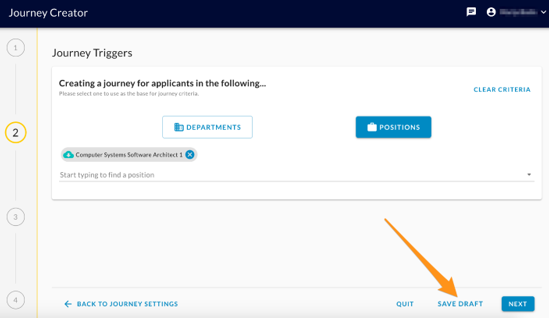
- If the user clicks "Quit", the journey is not saved and remains on the page.
Next
Once trigger criteria have been added to the form, users have the option to proceed to the next step in the process of building a journey.
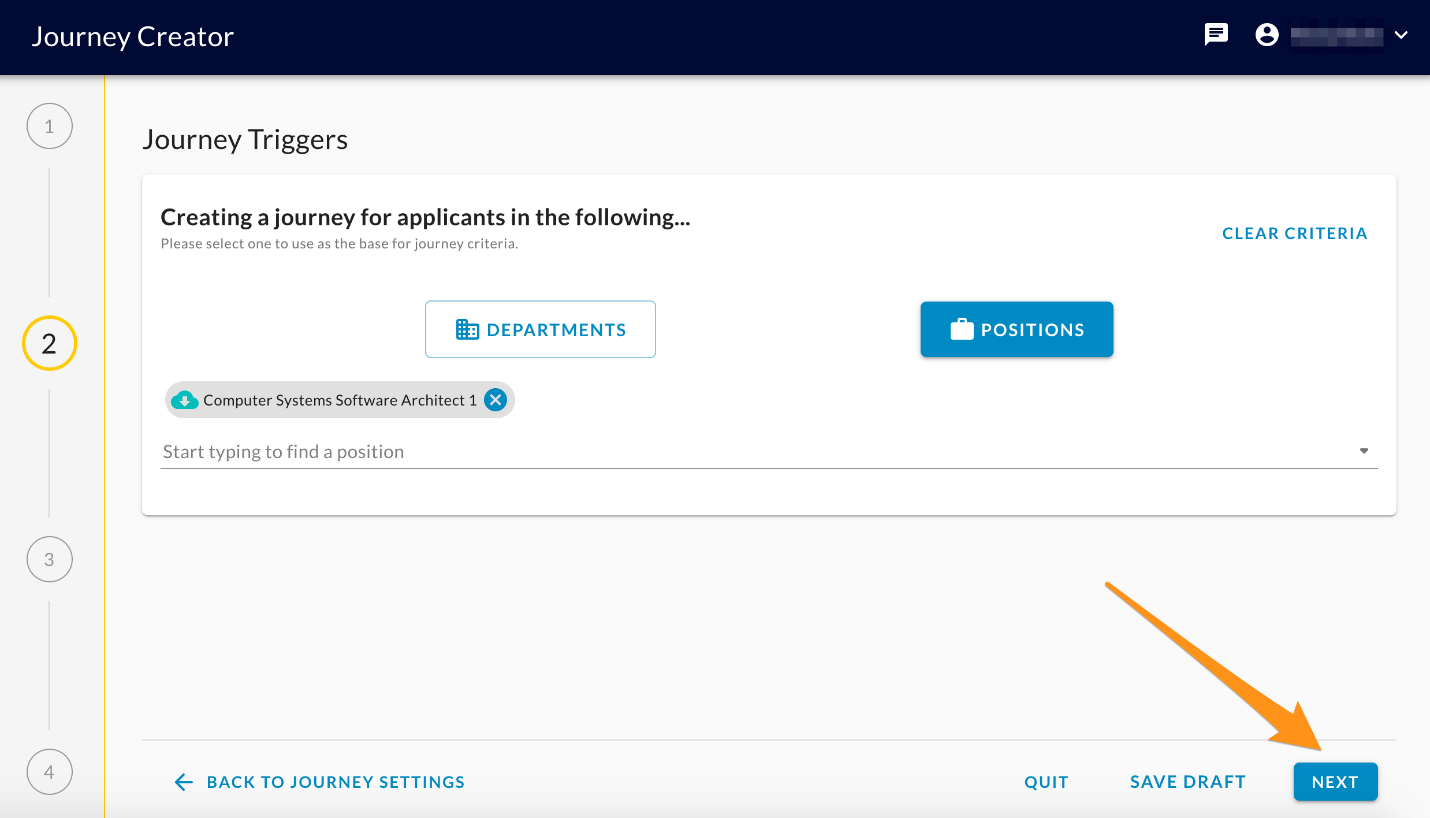
The user clicks the "Next" button and navigates to the "Stage Messaging" step of the journey builder.
Add Advanced Triggers
When creating a Journey with a "Department" context, an additional section will be available to allow for additional "Advanced Triggers". These advanced triggers allow for deeper targeting of candidates that are not just department specific.
The user clicks on the following button to display an additional form:
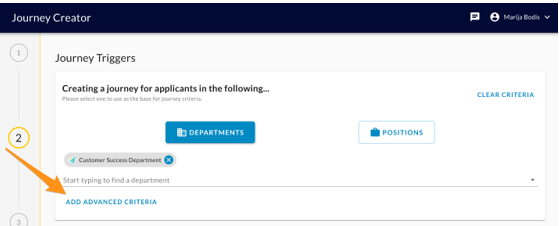
The form is displayed as follows:
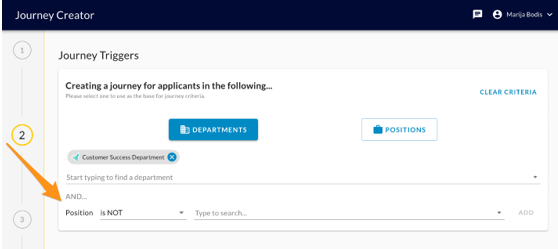
Any additional advance trigger criteria are considered as an "AND" condition. If multiple values are selected for any one advanced trigger criteria, it's considered an "OR" operation.
For example- DEPARTMENTS is Customer Success Department AND POSITION IS NOT "CSS Team Lead" OR "Customer Success Team Lead (1010101)".
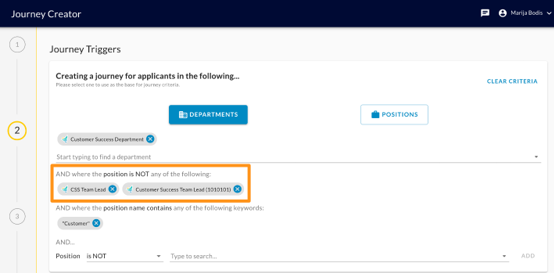
In our current state, only position level attributes can be added as advanced trigger criteria. Under the hood, it is more flexible and we are able to add additional conditional attributes as we learn more from our customers' needs.
The current list of advanced triggers includes:
- Position is NOT: the selected position will be excluded
- Position name exactly matches: the journey will apply only to the position with the exact name
- Position name contains: the journey will apply only to the positions that contain the entered word(s)
- Position name does NOT contain: the journey will apply only to the positions that do not contain the entered word(s)
- Position location is:the journey will apply only to the positions that have the chosen location
- Position location name contains:the journey will apply only to the positions whose location includes the entered word(s)
Position is NOT
- When "Position is not" is selected, users have the ability to select from a type-ahead search specific positions that have been imported into the system.
- When evaluating each imported candidate, if the candidate is in the selected position, the candidate will NOT be added to the journey.
Position name exactly matches
- When "Position name exactly matches" is selected, users have the option to enter the name of the position.
- When evaluating each imported candidate, if the candidate is in a position where the name exactly matches the specified phrase, he will be added to the journeys. Candidates that don't meet this condition will not be added to the journey.
Position name contains
- When "Position name contains" is selected, users have the option to enter the name of the position.
- When evaluating each imported candidate, if the candidate is in a position where the name contains the specified phrase, he will be added to the journeys. Candidates that don't meet this condition will not be added to the journey.
Position name does NOT contain
- When "Position name does NOT contain" is selected, users have the option to enter the name of the position.
- When evaluating each imported candidate, if the candidate is not in a position where the name contains the specified phrase, he will be added to the journeys. Candidates that don't meet this condition will not be added to the journey.
Position location is
- When "Position location is" is selected, users have the option to enter in the location name of the position.
- When evaluating each imported candidate, if the candidate is in a position where the location name contains the specified phrase, he will be added to the journeys. Candidates that don't meet this condition will not be added to the journey.
Position location name contains
- When "Position location name contains" is selected, users have the option to enter in the location name of the position.
- When evaluating each imported candidate, if the candidate is in a position where the location name contains the specified phrase, he will be added to the journeys. Candidates that don't meet this condition will not be added to the journey.
Setting up Path Messaging
A Journey consists of multiple messaging paths a candidate can go through. Each path has its own trigger criteria and messaging flow.
Add a Path
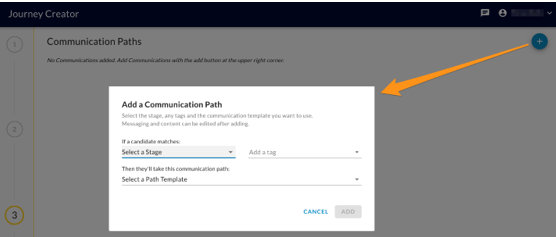
Click the blue "+" icon to add a path to the journey. A form is displayed in a modal.
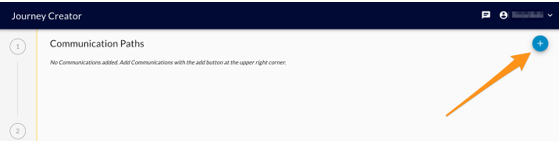
When on the communication path modal, the user selects:
- Stage: populated with the list of hiring stages
- Tags: list of candidate tags that are available to select from
- Path template: List of pre-baked templates. Each template defines the set of communications, steps, and delays between steps.
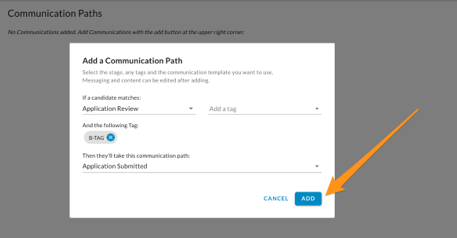
- The user clicks "Add" to add the triggers and associated messaging as a new path for the journey.
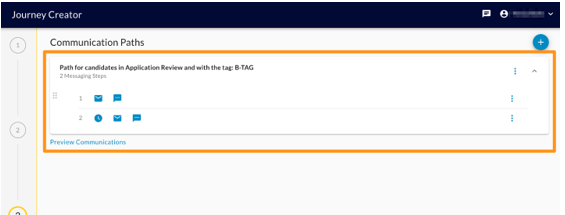
- After the path is added a card displaying the details of the path is shown to the user. The candidate that meets the trigger criteria for the path the journey will receive the set of communications that are associated with it. A card will be displayed on the page indicating the steps and types of communications for each step in the communication flow.
SMS Message in a Step
View/Edit SMS Message
SMS messages that have been set up for the stage have the following icon:
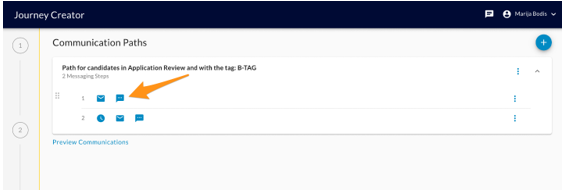
Click on the icon to view the content of the message:
- Use the content editor and styling controls to edit the content of the message
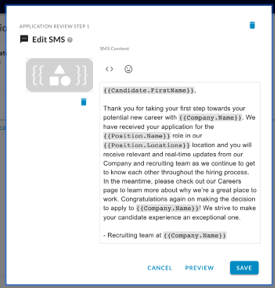
- Click "Save" to save changes. The changes will be saved and the popup will be closed.
- Click "Cancel" to close the popup. Any changes will be lost.
Preview SMS Message
Click Preview to send a preview of the content to a mobile phone number. You'll see the following popup:
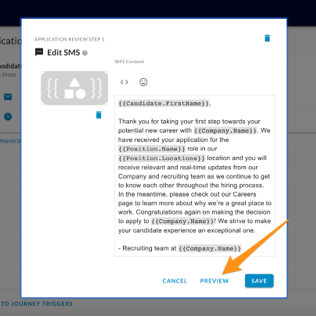
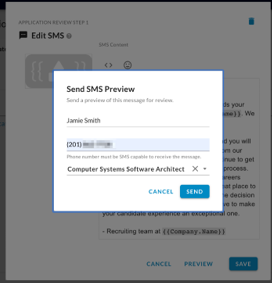
- The name and phone number will be pre-populated from the currently logged in user account. Both of these can be modified.
- Click "Send" to send a preview of the message to the specified phone number.
Note:
- Merge fields will be represented as merge field labels (e.g. Candidate.First_Name) in the preview message (as there is no job application to reference at the time of preview).
- The logo will be represented with a placeholder image(as there is no job application to reference at the time of preview)
Delete SMS Message
Click the trashcan icon to delete the message from the message step. The following confirmation dialogue will be displayed:
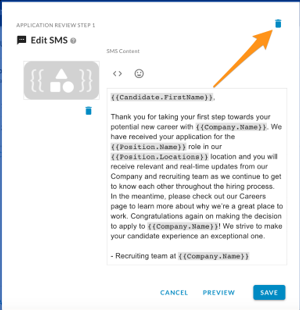
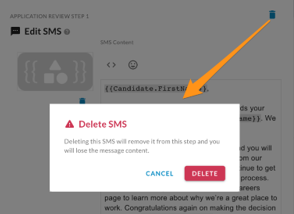
- Click "Delete" to confirm delete of the message
- Click "Cancel" to keep the message.
Email Message in a Step
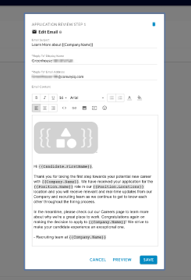
View/Edit Email Message
Email messages that have been set up for the stage have the following icon:
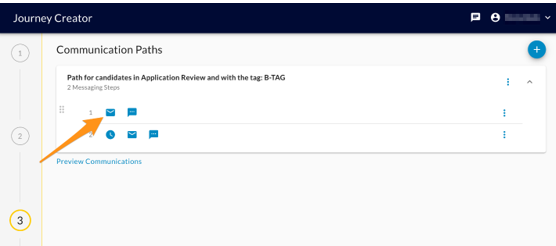
Click on the icon to view the content of the email message:
- Use the content editor and styling controls to edit the content of the message
- The user must enter a "Reply To Display Name" and "Reply to Email Address". Candidates will be sending messages to the reply to when they reply to the email messages they receive.
- Click "Save" to save changes. The changes will be saved and the popup will be closed.
- Click "Cancel" to close the popup. Any changes will be lost.
Preview Email Message
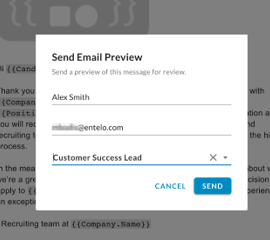
Click Preview to send a preview of the content to an email address. You'll see the following popup:
- The name and email address will be pre-populated from the currently logged in user account. Both of these can be modified.
- Click "Send" to send a preview of the message to the specified email address.
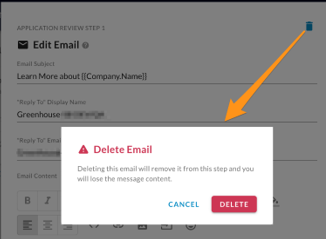
Delete Email Message
Click the trashcan icon to delete the message from the message step. The following confirmation dialogue will be displayed:
- Click "Delete" to confirm delete of the message
- Click "Cancel" to keep the message.
Delay in a Step
View/Edit Delay
Steps that have been set up with a delay have the following icon:
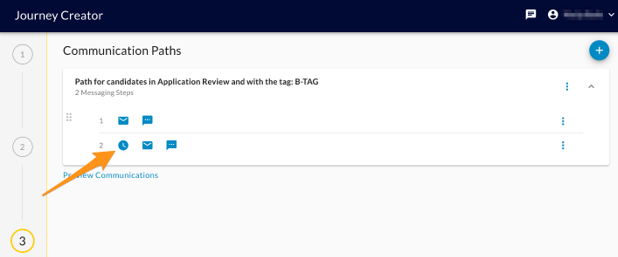
Click on the icon to edit the delay:
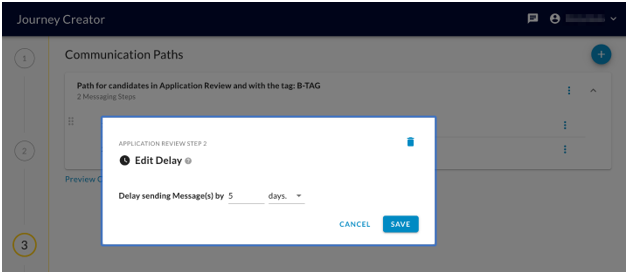
- Enter an integer in the first field to specify the time interval and select the unit of time from the dropdown in the second field (days or hours)
- Click "Save" to save the changes.
- Click "Cancel" to close the popup. All changes will be lost.
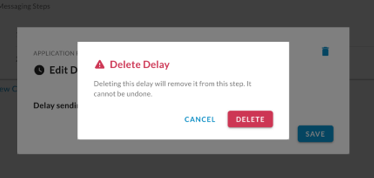
Delete Delay
Click the trashcan icon to delete the delay from the message step. The following confirmation dialogue will be displayed:
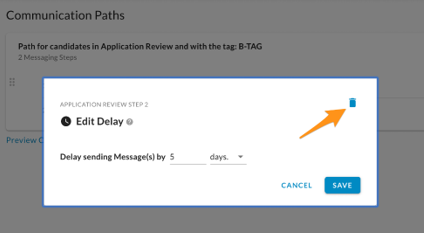
- Click "Delete" to confirm delete of the delay
- Click "Cancel" to keep the delay.
Path Menu
There is a menu that allows for additional controls on the path that is added to the journey. Click on the following icon in the journey path:
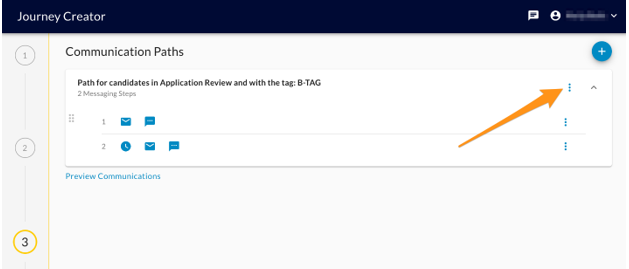
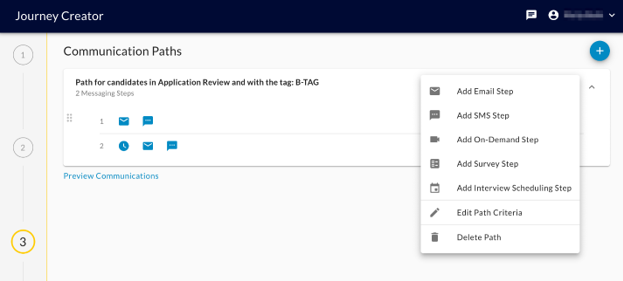
Clicking on the icon will reveal a menu with the following options:
- Add Email Step
- Add SMS Step
- Add On-Demand Step
- Add Survey Step
- Add Interview Scheduling Step (if Scheduling feature is enabled)
- Edit Path Criteria
- Delete Path
Clicking on "Add Email Step" will add a new messaging step for the selected stage with an email icon where content can be added.
Clicking on "Add SMS Step" will add a new messaging step for the selected stage with an SMS icon where content can be added.
Clicking on "Add On-Demand Step" shows a step with a dropdown. Select an On-Demand template from the list of options to trigger the appropriate on-demand and related on-demand communications when the candidate reaches this step of the path.
Clicking on "Add Survey Step" shows a step with a dropdown with the Candidate Survey selected. This will trigger the candidate survey and related survey communications when the candidate reaches this step of the path.
Clicking on "Add Interview Scheduling" shows step with a dropdown. Select a Scheduling template from the list of options to trigger the appropriate scheduling request and related to scheduling communications. Optionally, include a "Last day to Schedule" as a date. Candidates in this journey will not be able to schedule past this date.
Click on "Delete Path" to delete the stage from the Journey. The following confirmation dialogue will be displayed:
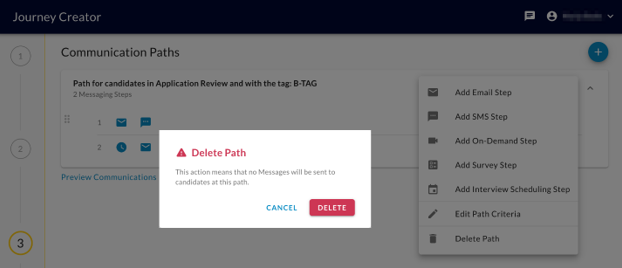
- Click "Delete" to confirm delete of the stage
- Click "Cancel" to keep the stage as part of the journey.
Step Menu
There is a menu that allows for additional controls on the messaging step that is added to the stage. Click on the following icon in the messaging step:
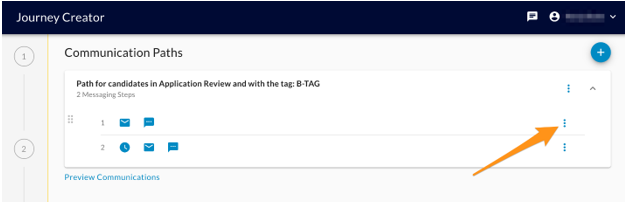
Clicking on the icon will reveal a menu with the following options:
- Add Delay
- Add Email
- Add SMS
- Delete Step
- Move Step Up
- Move Step Down
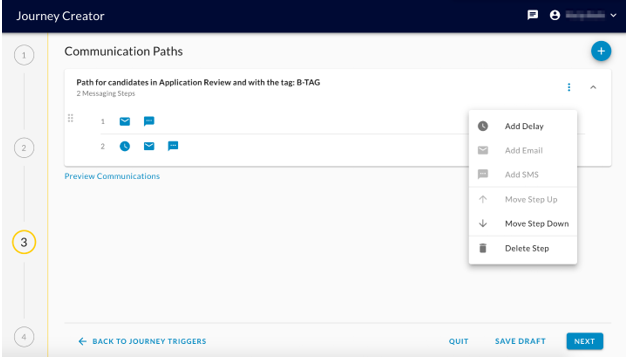
- For each of the already added options, it will be disabled and grayed out.
- Click "Move Step Up" or "Move Step Down" to move and reorder steps. If the step is the first step, "Move Step Up" is grayed out. If the step is the last step, "Move Step down" is grayed out.
- For each option that is not grayed out, the user will be able to add it to the message step. The user will see edit modals for adding Email, SMS, or a Delay to the step.
- When communications are sent out. Delays are executed first for each step and then messages are sent subsequent of the delays.
- Click on "Delete Step" to delete the messaging step from the journey stage. The following confirmation dialogue will be displayed:
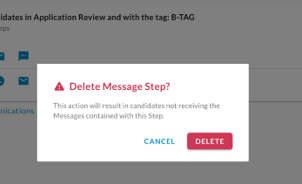
- Click "Delete" to confirm delete of the message step
- Click "Cancel" to keep the message as part of the journey stage.
Reviewing Journey Setup
The final step in building a Journey is the review step. This is where the user can preview the contents and setup of the entire Journey before launching it.
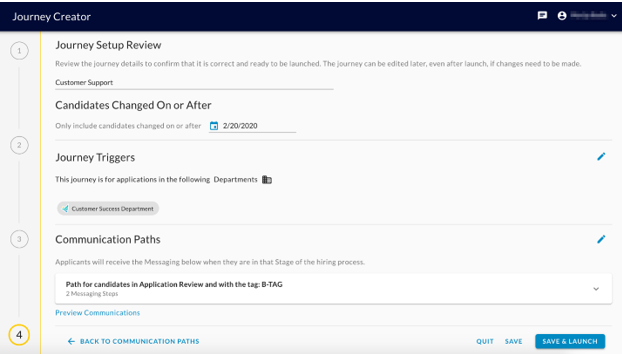
The Journey Review consists of the following sections:
- Name
- "Candidates Changed On or After" date
- Trigger Criteria
- Stage Messaging
Journey Name
The journey name is required to save or launch it. If the user is coming back to a previously saved draft, it will be pre-populated with the name that was given to it.
Trigger Criteria
- All added trigger criteria will be displayed in a readable format so that the user will understand under what conditions candidates will be added to the journey.
- Clicking the pencil icon in this section will navigate the user back to the trigger criteria step to make further modifications.
Stage Messaging
- All stages and their associated message steps will be displayed in read-only mode for this section. Clicking on the delay, SMS, or email icons will display the contents in read-only mode.
- Users will be allowed to send previews of the content to specified email addresses and mobile phone numbers.
- Clicking the pencil icon in this section will navigate the user back to the Stage Messaging step to make further modifications.
Save and Launch
- Click on Save and Launch to activate the Journey. Any new candidates imported or existing candidates that have had a change in the last 90 days will be added to the journey if they've met the conditions specified in the trigger criteria.
- The following popup is shown to confirm the activation of the journey:
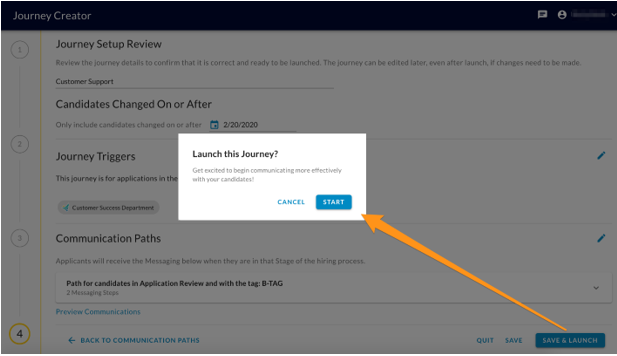
- Click on "Start" to save the journey and activate it.
- Click on "Cancel" to close the popup and remain on the page