User Permissions - How to Set Up and Define Access to ConveyIQ
User Permissions
This section will provide information on how user permissions are organized and enforced within all the pages of the Recruiter Interface of the Convey New Suite.
What are permissions and who can use them?
Permissions are sets of actions that grants users the ability to access a certain page or feature. In ConveyIQ, permissions are organized into Permission Groups following a 'Recruiter Role' model.
How are the permissions groups organized?
Permissions Groups are split into two main Levels:
- General Permission Level: Includes permissions that do not have a direct relation with Departments:
- Company Admin
- Library Admin
- Department Permission Level: Includes only permissions that have a direct relation with Departments:
- Creator & Reviewer
- Reviewer
- Read Only
Each Permission Group contains a predefined list of Single Permissions as illustrated in the tables below:
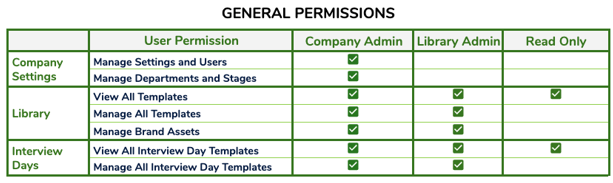
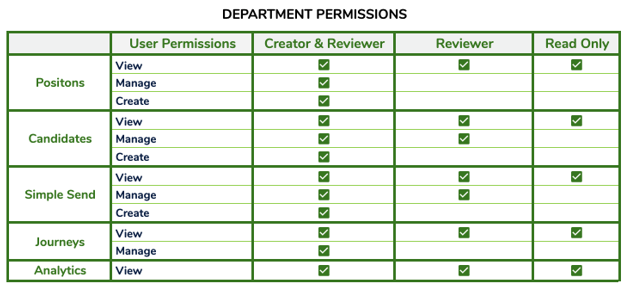
Note: Users with no permissions will see only their own template, nothing else, just template they created.
Who can assign permission groups?
A user with 'Company Admin' permission group can set up permissions for their company users from the Client Convey App - Settings > User Management page. You may also reach out to your Customer Success Manager for assistance.
When and where is the permission set?
Permission Groups can be set when inviting a new user into the Recruiter Convey App or when creating a user directly from the Admin Panel
How are the permissions assigned?
Permission groups are assigned per user in the company. The Convey platform does not enable choosing Individual Permission, only Permission Groups and the list of individual permission is not listed anywhere in the UI.
Note: Permissions are set by choosing between Permission Groups.
There are 3 ways to assign permission groups:
- By selecting from General Permissions Level
- By selecting from Department Permissions level and setting groups that will apply to all present and future imported Departments (all departments). These permissions will be valid for all already imported departments and future ones that get imported.
- By selecting from Department Permissions level and setting groups that will apply to Individual Departments that the user picks from a list of all existing departments. These will override the permission groupset for all departments (if set) for the particular department.
All selections default to No Permissions for each level.
How to set permissions based on different cases and what is a Master Admin?
Note: This is only if a user needs to have access to absolutely everything in the Company
- Navigateto the "Settings" menu, then to the"Departments" section.
- Select "General Permissions": Company Admin group.
- Select "Department Permissions": Creator & Reviewer group for All Departments.
- This user will be flagged asMaster Adminwith the 'Shield' icon in the list for easier identification.
If a user needs to have access, view and manage different templates and company assets to the Library page:
- Select General Permissions: Library Admin group
If a user needs to have access to Journeys and Interviews for all departments (existing and future imported ones):
- Select Department Permissions: Creator & Reviewer group for All Departments
If a user needs to have constant access to Journeys and Interviews for a specific set of departments ONLY:
- Select Department Permissions: No Permissions for All Departments
- Select specific departments from the list and for each one select permission group:Creator & Reviewer.
If the user needs to have access to Interviews for a specific set of departments ONLY and Journeys for all other departments:
- Select Department Permissions: Creator & Reviewer for All Departments
- Select specific departments from the list and for each one select permission group:Reviewer.
If a user needs to have access to Interviews but only to VIEW them without manage permission, for a specific set of departments ONLY:
- Select Department Permissions: No Permissions for All Departments
- Select specific departments from the list and for each one select permission group:Read Only.