Email Notifications
Configure and manage email notifications in Workflow. Email notifications are system-generated messages triggered by task and event actions. They can be specialized, customized, previewed, and resent.
Navigate to Administration > Notifications to access the Notifications page.
Default notifications
You get default notifications when you implement the system. They are organized by type and grouped within a tab.
| Tab | Action generating notifications | Action description |
|---|---|---|
| Employee | Welcome | Sent when a new employee is created |
| Employee Note Added | Sent when a note is added to an employee's profile | |
| Shared Dashboard Activated | Sent when a shared dashboard is activated | |
| Shared Dashboard Deactivated | Sent when a shared dashboard is deactivated | |
| Event Launched | Sent when an event is created for an employee | |
| Employee Login ID Changed | Sent out when an employee's login ID is modified | |
| Tasks | Task Note Added | Sent when a note is added to a task |
| Task Update | Sent when a task's assignee, due date, or status is changed. The option to notify for active tasks only (checked) or for all tasks (unchecked). | |
| Task Activate | Sent when a task is activated, or the activation date is changed and assigned to an individual | |
| Unclaimed Task Activate | Sent out when a team task is activated and has not yet been assigned to a specific team member. | |
| Task Warning | Sent every night that a task is almost overdue | |
| Task Overdue | Sent every night that a task is overdue | |
| Task Added | Sent when a task is added to an employee event | |
| Task Deleted | Sent when a task is deleted from an employee's event | |
| Task Completed | Sent when a task is completed | |
| Events | Event Welcome | Sent when an event is created for an employee. |
| Event Update | Sent when a category, manager, or date has changed for an event. Changes to the tasks (added or deleted from a launched event) also generate notification. | |
| Event Note Added | Sent when a note is added to a employee's work event | |
| Event Cancelled | Sent to assignees of tasks for a cancelled employee event | |
| Bulk Upload | Bulk Employee Upload Results | Sent after the bulk employee import process is complete |
| Erroneous Bulk Employee Upload | Sent after a bulk upload completes with errors | |
| Pending Employees for Approval | Sent when a bulk employee import has finished and pending employees were created and assigned to managers | |
| Pending Employee Reassigned | Sent when one or more pending employees is reassigned to a different manager | |
| Bulk Category Value Upload Results | Sent after category values have been imported via the bulk upload feature | |
| Erroneous Bulk Category Results | Sent after category values have been imported via the bulk upload feature and errors occurred | |
| E-Verify | e-Verify Failure | Sent after an e-Verify status generates an e-Verify Failure |
| e-Verify SSA TNC | Sent after an e-Verify status generates an e-Verify SSA TNC message | |
| e-Verify DHS TNC | Sent after an e-Verify status generates an e-Verify DHS TNC message | |
| e-Verify Retry | Sent after an e-Verify status generates an e-Verify Retry message | |
| e-Verify Success | Sent after an e-Verify status generates an e-Verify successful update message | |
| e-Verify Resubmit | Sent after an e-Verify status generates an e-Verify SSA Review and Resubmit | |
| e-Verify Missing SSN | Sent after an e-Verify status generates an e-Verify Missing SSN message | |
| e-Verify Potentially Naturalized | Sent after an e-Verify status generates an e-Verify Potentially Naturalized Citizen message | |
| e-Verify Confirmation | Sent after an e-Verify status generates an e-Verify Confirmation of Information message | |
| e-Verify SSA FNC | Sent after an e-Verify status generates an e-Verify SSA FNC message | |
| e-Verify DHS FNC | Sent after an e-Verify status generates an e-Verify DHS FNC message | |
| e-Verify Duplicate | Sent when e-Verify duplicate case(s) are detected. | |
| e-Verify Process Failure | Sent with there's a government failure processing e-Verify case | |
| e-Verify Final State | Sent when e-Verify case has reached a final state | |
| Settings | Default Warning Days | Default value used to populate a new task definition |
| Enable Notification Emails | Set to 1 to enable notifications; set to 0 (zero) to disable all notifications | |
| Send Notifications When notes are added | Set to True to set the default setting for sending notifications when notes are added. | |
| Support Email address | The e-mail address that is inserted into notifications for the SUPPORT_EMAIL token | |
| Note: Any changes to the Settings page take 24 hours to go into effect. |
Notification delivery (Specialization table)
Notification types are organized in a specialization table. The system uses it to determine what notifications to send.
Top-down approach
The system processes a specialization table from top to bottom. If a specialization table has multiple rows, the system starts at the top and works down. It looks for a notification that is perhaps specialized for a task, event, category, and so on (depends on the notification type.)
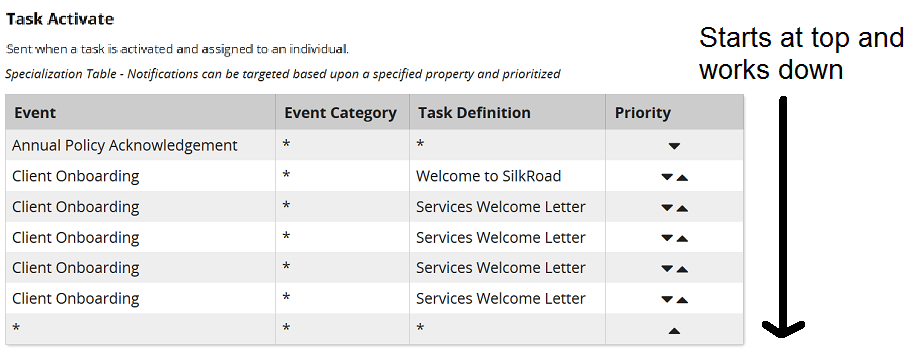
If the system does not find a specialization match, it sends the default notification. It's the blank row with asterisks.
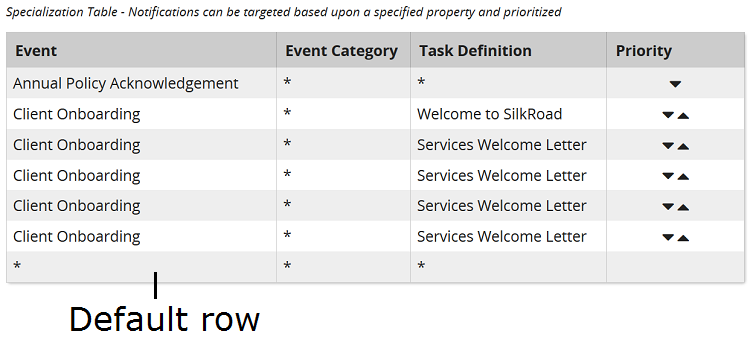
The default notification is at the bottom. You cannot move it higher in the list. You can prioritize specialized notifications using these buttons: 
 .
.
Indicators
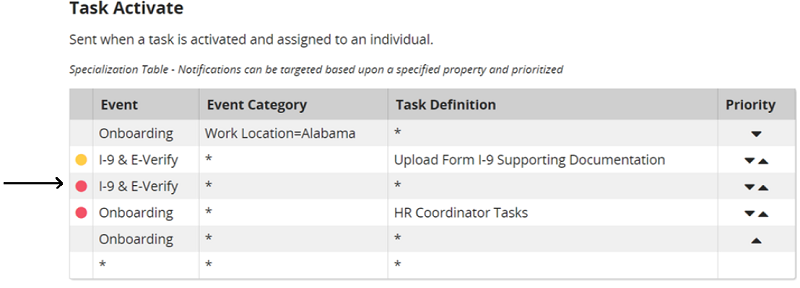
A red indicator means the notification is disabled. The system ignores it. The system continues to search the table for a specialization until it finds one or hits the default template and then sends that.
A yellow indicator means the notification is enabled, but the Send emails option is not checked. The system recognizes the specialization but does not send an email. The system stops searching for notifications to send because it found a match.
Specializing notifications
You can specialize notifications to make them meet your organization's needs. Some of the things you can do:
- Specialize by category, event, task, and key property
- Customize recipients, subject line, message content
Key info
- Key Property specializations are employee-based.The notification is sent when it matches employee key property fields in the Employee Profile.
- Event specializations are based on events. The notification is sent when a matching event is launched or updated.
- Event Category specializations are based on events. The notification is sent when it matches event categories selected when launching the event. (Event categories personalize a launched event. Event category values are selected based on the employee benefiting from the event.)
Specialize a notification
- From the navigation bar, click Administration > Notifications.
- Click the tab containing the notification.
- For the notification you want, click the template row (blank asterisk line) in the specialization table.
- On the Edit Notification page, click a specialization button. (Do this first before customizing. If you customize a notification and then click this button, your changes are lost.)
Tip: Button label varies based on the notification. Examples: Specialize on User Key Properties, Specialize on Events, Specialize by Task Definition, and so on.
- On the pop-up window, make selections.
- (If applicable) Customize recipients and content.
- Click Save. The specialization appears in the specialization table. The order in which it appears matters. The system processes specializations from the top to the bottom. Move it up or down based on how you want it processed.
Customize notification recipients
- The To, Cc, and Bcc lines have a 32K character maximum. Exceeding this limit causes a SMTP error.
- From the navigation bar, click Administration > Notifications.
- Click the tab containing the notification.
- In the specialization table for the notification, click its row.
- Customize the To, Cc, Bcc as you want.
Tip: Click more options to see the Cc, Bcc, Reply-To, and Subject fields.
- Click Save.
Customize notification subject line
- The Subject line has a 179-character maximum limit. Any text over that maximum is truncated.
- From the navigation bar, click Administration > Notifications.
- Click the tab containing the notification.
- In the specialization table for the notification, click its row.
- Change the Subject line.
- Click Save.
Customize notification content (message body)
- You can include free form text, event specific fields, and employee profile fields in the message body of your notification.
- When cutting, copying, and pasting into the message body, Chrome and Firefox protect the clipboard for the JavaScript method that TinyMCE uses to paste data. Use Ctrl+X/C/V to cut, copy and paste information into the message body.
- From the navigation bar, click Administration > Notifications.
- Click the tab containing the notification.
- In the specialization table for the notification, click its row.
- In the body text panel, do all that apply:
- Enter free text
- Use the Rich Text Editor to do cool things like bold, italicize, insert images, insert links, and so on
- Select event notification field(s) to insert
- Select employee profile field(s) to insert (Employee Profile fields are not shown if Allow notification to be merged is checked. If you previously added employee profile fields to the notification body and later checked Allow notification to be merged, the employee profiles fields will not be evaluated when the notification is sent.)
- (If applicable) Click Allow notifications to be merged check box to merge notifications.
Note: This check box is only available for these task notification types: Task Activate, Task Warning, and Task Overdue. It also only applies for tasks notifications with no specialization or specialized event.
- (If applicable) Click Notify for active tasks only check box to send notifications for active tasks only. Otherwise, notifications are sent for all tasks.
Note: This check box is only available for the Task Update notification type.
- Click Save.
Preview & export notifications
Preview a notification
- From the navigation bar, click Administration > Notifications.
- From within a notification, click Preview E-mail to view your notification message with sample values.
- Click Close to close the preview window.
Preview all notifications
- You can preview all notifications with one click.
- Preview is based on which notification tab you are viewing and presents all the notifications within that tab. You can click other tabs to preview those notifications, too.
- The preview shows the notification contents along with any event, event category, task definitions, and key properties.
- If you make edits to notifications, click Reload to view those changes.
- From the navigation bar, click Administration > Notifications.
- Click a notifications tab.
- Click Preview All Notifications.
Export all notifications
Notifications are exported in XML format.
- From the navigation bar, click Administration > Notifications.
- On the pop-up, do one of the following:
- Click Open with to open the export file.
- Click Save As to save to your Downloads folder on your system.
Edit notifications
Edit a notification template
- You can edit (customize) the notification template.
- The notification template is the base template that comes with your system. It is the blank row with an asterisk.
- Include things on the base notification template that you want on all notification templates. Generally, things like an employee name, banner image, and so on.
- From the navigation bar, click Administration > Notifications.
- Click the tab containing the notification.
- In the table for the notification, click the blank row with the asterisk.
- On the Edit Notification page, make changes.
- Click Save.
Edit a specialized notification
- From the navigation bar, click Administration > Notifications.
- Click the tab containing the notification.
- In the specialization table for the notification, click its row.
- On the Edit Notification page, make changes.
- Click Save.
Manage notifications
Delete a specialized notification
- Deleting a specialized notification removes it from the system.
- You can only delete specialized notification types. You cannot delete a default notification.
- From the navigation bar, click Administration > Notifications.
- Click the tab containing the notification.
- In the specialization table for the notification, click its row.
- On the Edit Notification page, click Delete.
- On the confirmation pop-up, click Yes.
Disable a notification
- If you do not want the system to consider a specialized notification, you can disable it.
- The system ignores a disabled notification in the specialization table. It continues to search for a specialization until it finds a match or hits the default template.
- A red indicator in a specialization table means the notification is disabled (ignored for processing).
- From the navigation bar, click Administration > Notifications.
- Click the tab containing the notification.
- In the specialization table for the notification, click its row.
- On the Edit Notification page, uncheck the Enabled option.
- Click Save.
Turn off a notification's send email capability
- If you do not want the system to send an email for a specialized notification, you can turn emails off.
- The system recognizes a do-not-send-email notification in the specialization table as enabled. It does not send an email.
- A yellow indicator in a specialization table means the notification does not send an email.
- From the navigation bar, click Administration > Notifications.
- Click the tab containing the notification.
- In the specialization table for the notification, click its row.
- On the Edit Notification page, uncheck the Send emails option.
- Click Save.
Resend notifications
Resend a notification
- From the navigation bar, click Dashboard Summary. The dashboard opens with the Employees tab selected.
- Click an employee to go into their event. The Employee Task List opens.
- Click See Details to expand that panel.
- (If applicable) Click Send Welcome Email if you want to resend the welcome email.
- (If applicable) If there are active tasks for assignees, select assignees to resend notification for those active tasks.
- Click Resend.
Resend the welcome email
- From the navigation bar, click Dashboard Summary. The dashboard opens with the Employees tab selected.
- Click an employee to go into their event. The Employee Task List opens.
- Click See Details to expand that panel.
- Click Send Welcome Email.