Forms and documents in tasks
Associate forms, documents, and download packages with task definitions.
Associating a form with a task
You can associate a form (that your administrator created and made available) with a task. Form association options are:
- Include a Form to fill out or review
- Request a document to be uploaded
- Request a document be reviewed
PDFs
Your administrator can configure each form to be associated with a .pdf file. If your form is associated with a .pdf file, the data collected is merged to a pdf to be printed. The Print All Forms functionality applies to forms that are associated (in the form definition) with a pdf file. For additional information on forms and pdf files implemented in your system, contact your administrator.
Web service
For customers retrieving forms through the Web Service: When an employee chooses the Save and Completed option on a form, the form status is set to verified. The GetForms methods include a strVerified parameter to select forms that have been completed.
Keywords to include a form in your task
The following keywords should be included in the user description of the task definition to associate forms with a task:
| Keyword Syntax | Description | Example of user description |
|---|---|---|
insertforms insertForm | To associate a custom form to this task, include the keyword insertforms or insertForm in the text of the user description.* This option requires you to use "Pick Form" to specify the form to insert. The assignee will have a link to the (selected) form in the body of the assigned task. After the assignee saves the form, a copy of the form with its contents is saved for employee benefiting from the event. | insertforms or insertForm Complete the attached Emergency Contact form. |
| PRINT_ALL_FORMS | A link is inserted into the employee instructions as "Print all printable forms" | PRINT_ALL_FORMS |
| viewform:X~Y | To view a form from a task, use the View Forms Links for syntax specific to your company's forms. This option does not require you to "Pick Form", the form name is in the syntax. | viewform:ExampleForm~ExampleForm |
*The default keyword is insertforms or insertForm. Contact your Administrator for your site's configurable keyword.
Include a Form to fill out or review
- From the Employees Instruction tab, click Include a Form to fill out or review.
- Click Pick Form and select a form.
- Select the appropriate check box(s) based on the selected form:
This option: Does this: Additional Information The Form is required Ensures a form is completed for the task to be recognized as completed Assignee cannot complete the task unless the form is Save and Completed.
If this option is checked, the task must associate a form with the task AND include the insertforms or insertForm keyword in the task description. If you omit the associated form the task cannot be completed.
Read Only Allows assignee to review the form but not make changes. Use to review or verify forms.
Overrides the modify permission only if the "Task Assignee ID" (of the current task) is a specific assignee.
Check if the Form is finished upon task completion Indicates this is a form review task If only one person is filling out a form, task should have this option checked.
If the form requires multiple reviews by different people, only upon the Final review should this option be checked.
Exclude Signature Completion Defers signature completion to a later task Use when you want a collection of Forms (download package) to be signed all at once rather than individually one-at-a time. - (If applicable) If you selected an I-9 Form, select a step.
- Enter the keyword
insertformsorinsertFormin the Employee Instructions field.Note: If you forget to include this keyword, an instance of the form will not be generated for this task.
- Click Next or Save.
Request a document to be uploaded
- As part of a task definition, you may want to set it up to request a benefiter (like a new hire) upload a document. For example, you may want a new hire to upload a photo for a photo badge, a valid drivers license, documentation for direct deposit, and so on.
- This topic assumes you are in a task definition on the Employee Instruction tab.
- For this topic, we'll use an example of uploading a photo for a photo badge.
- From the task definition, click the Employee Instruction tab.
- In the Employee Instructions box, tell the benefiter how to perform the task. For our example, let's enter instructions about uploading a photo:
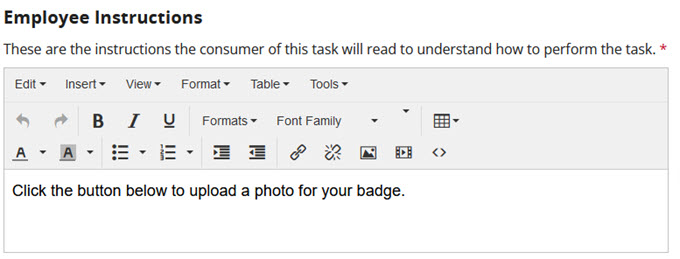
- Click Request a document to be uploaded.
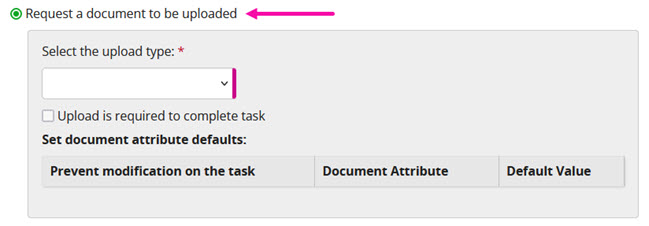
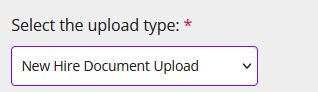
- Click Select the upload type and click one of these options:
- New Hire Document Upload
- I-9 Document Upload
- Employer Document Upload For our example, let's select New Hire Document Upload:
- (Optional) If the document must be uploaded before the task can be completed, click Upload is required to complete task. Otherwise, do not check this option.
- Set document attributes: In our example, let's say we selected (checked) the Prevent modification on the task option and entered photo for Document Title:
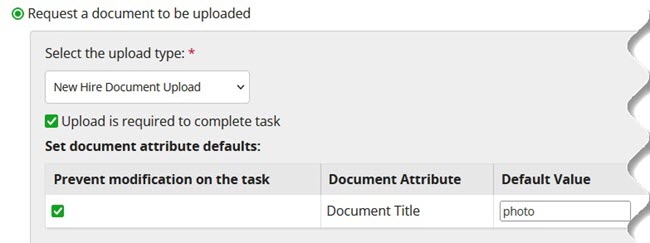 The Uploaded Documents table on the task would look like this after the benefiter uploaded a document: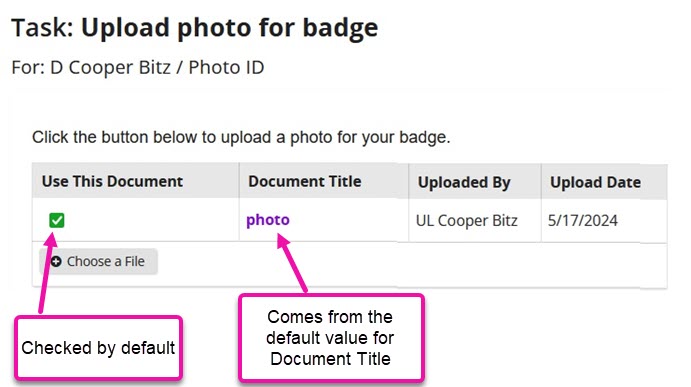
This attribute: Does this: Prevent modification on the task Controls whether the Use This Document check box is selected by default in the Uploaded Documents table on the task.
- If checked, after the benefiter uploads a document, that document is selected by default to be used to complete the task.
- If unchecked, after the benefiter uploads a document, that document is not selected by default. The benefiter must select (check) the document so it can be used to complete the task. Also, if there were existing uploaded documents, they are unchecked, too.
Document Attribute (Document Title) - If a document title is provided, then it appears in the Document Title column on the Uploaded Documents table on the task.
- If this attribute is left blank, then the document title is set to the name of the document the benefiter uploads.
- Click Next or Save. The task can now be pushed to benefiters as part of the event it is associated with.
Request a document to be reviewed
- You can set up one or more uploaded documents to be reviewed within a task.
- The task assignee can review documents without having special permissions.
- If a review task is assigned to a team that does not have privileges to view uploaded documents, the task does not present any documents for reviewing. Instead this message appears: There are no documents. After a team member claims the task, saves changes and returns to the task, team members can then view the documents and complete task.
- From the Employees Instruction tab, click Request a document to be reviewed.
- Click Select the document type to be reviewed and click one of these options:
- (Benefiter) Document Upload: Used when the upload is done by the event benefiter. (Benefiter) is whom the event is for. Example: New Hire Document Upload.
- Click Add Document Attribute. The Include Attribute for Matching pop-up opens.
- Enter the default value for the document title. It must match the document title as designated in the Document Upload task.
- Click Add.
Tip: If there are more documents to be reviewed within this task, click Add Another Document Attribute and add another document.
- Click Next or Save.
Create a download package
- A task administrator can define a custom package of Forms and uploaded documents to be downloaded from a task. Supported uploaded documents includes Forms and these file types: .doc, .docx, .pdf, gif, jpeg, jpg, png, bmp, tiff.
- The task can be assigned to a new hire or any task assignee who has a Rival Workflow user account.
- Table of contents—if configured—is the first page of the download package. You can remove it if you want.
- If Forms (that are part of the download package) are defined to exclude signature completion, those Forms can be signed all at once by selecting the Sign Package check box.
Identify tasks to be part of download package
Identify the tasks to be part of the download package. Let's say these are part of it:
- Offer Letter
- Job Description
- Employee Handbook (and acknowledgement form)
- Customized Benefits package
Create tasks
Create tasks for:
- Each of the download package contents
- The download task itself
Tip: Make the download task dependent upon the Forms/document tasks. You want all those Forms completed and documents uploaded before the download package is created.
Here's an example:
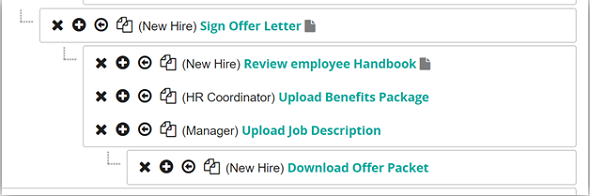
Configure items to be part of the download package
- From the Employees Instruction tab, click the Download Offer Packet task.
- Click Prepare a download package.
- (Optional) Change the default Download Package button label.
- Add Forms and uploaded documents.
- (Optional) Select Sign Package to have Forms (that were configured to defer signature) sent to the third-party signing service so they can be signed all at once.
- (Optional) Drag and drop to reorder the items.
- In the text editor panel (top of page), enter employee instructions.
- In the text editor panel, place cursor where you want to insert the download button. Click the button to insert it.
- Continue to set other task aspects (Categories & Assignments, Tasks & Dates, etc.)
- Click Save.
Including the latest updated document in a download package
Sometimes a person will go through an event more than once. For example, some organizations (like contract agencies) rehire the same people often. Several documents must be uploaded every time an event is launched, which leaves multiple versions of those documents on a user's profile.
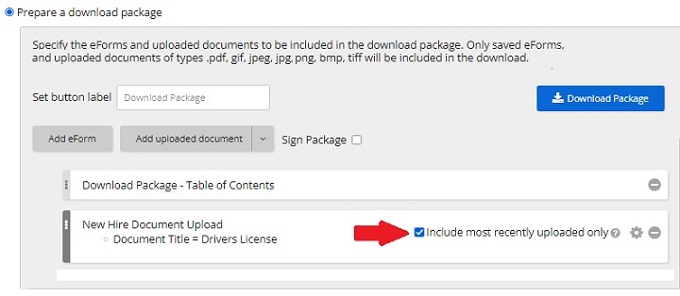
You can now designate that only the last document uploaded, with a particular attribute, is to be included in the download package. To do that, the Include most recently uploaded only check box must be selected (checked):
Include a Form in a download package
- This topic assumes that the download package task is already part of an event.
- You can get an overview of creating a download package here.
- From the navigation bar, click Administration > Manage Events.
- For the event that contains the download package task, click Edit Tasks. The Manage Task Definition page opens.
- For the download task you want to edit, click the name link.
- Click the Employee Instructions tab.
- Select the Include a Form to fill out or review option.
- From the Pick Form drop-down, select a Form.
- Select the options for the Form:
- The Form is required (uncheck if the form is optional)
- Click Save.
Including Forms completed in other events in a download package
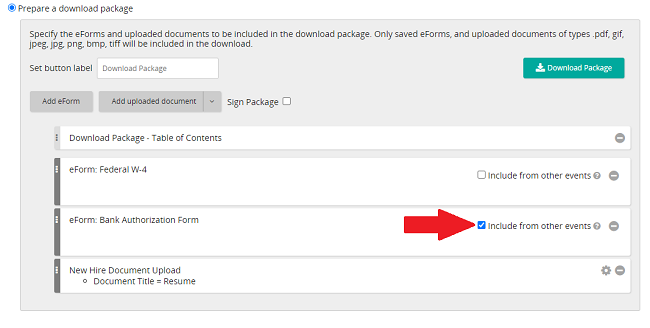
Forms completed in other events can now be included in a download package. To include a Form completed in other events, the Include from other events check box must be checked for that Form:
Key info
- To be included in a download package, the Form must be complete.
- If a Form has been completed two or more times, the most recently completed Form is included in the download package.
- If the same Form that is in an event with a download package is also included in another event, the status of the Form in the event with a download package controls what happens as shown in the following table.
| Form status in event with a download package task | Form status in other event | Result within download package |
|---|---|---|
| Form is complete | Complete | Form from the event with the download package task is included in the download package |
| Form has not been started | Complete | Form from the other event is included in the download package |
| Form is started but not complete | Complete | Form is not included in the download package |
Upload a file and include it in a task definition
- This topic shows you how to upload a document and include it in a task as a hyperlink.
- Two major steps: Upload document into the Eprise portal and link to that file in a task definition.
- You must be an administrator to upload documents into a portal (Eprise).
Upload file into the portal
- From the navigation bar, click Portals > Portal.
- On the Portals page, click the portal you want. The portal page home page opens.
- Click the gear icon and select Upload Media:
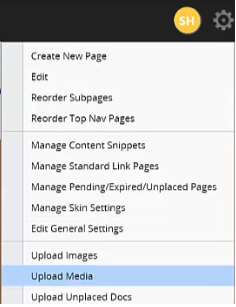 The portal's Eprise file structure opens.
 - Scroll to the event's folder:
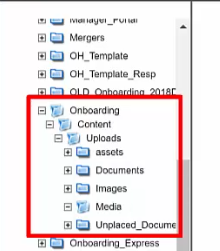
- Under the Uploads folder, select where to put the document.
Tip: Documents is a good folder to place the document. Also, make note of where you put it. You'll reference it later in the task definition.
- Click Upload Using Browse.
- Click Choose File, browse and select the file on your local hard drive, and click Upload.
- On the confirmation window, click Close Window. The uploaded file is now listed in the folder you uploaded it to.
- Close the Eprise browser tab.
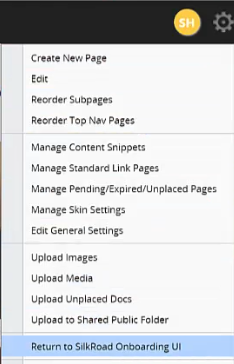
- On the portal page, click the gear icon and select Return to Rival Workflow UI.
Create a task definition and link to the uploaded file
- From the navigation bar, click Administration > Manage Events. The Manage Events page opens.
- In the list beside an event, click Edit Tasks. The Manage Task Definitions page opens.
- Click Create Unassociated Task.
- Complete the fields on the Details tab.
- Click the Employees Instructions tab.
- In the Employees Instruction text box, write some instructions and include the document name.
- Make the document name a link:
- Highlight the document name.
- Click
 .
. - On the Insert Link window in the URL field, locate the file you uploaded to the Eprise folder and select it.
- In the Target list, select New window.
- Click OK.
- Continue defining the task definition.
- When done, click Save.
Assign a document upload task to an email address
- This topic assumes the task is already part of an event.
- From the navigation bar, click Administration > Manage Events.
- For the event that contains the download package task, click Edit Tasks. The Manage Task Definition page opens.
- For the task you want to edit, click the name link.
- Click the Employee Instructions tab.
- Select the Request a document to be uploaded option.
- Select the document upload type and set the default document attributes.
- Click the Allow task to be assigned to an email check box.
- Click Save. Here's what happens when the benefiter opens the task.
- The benefiter enters an email address of the person (assignee) who will complete the task.