Company page
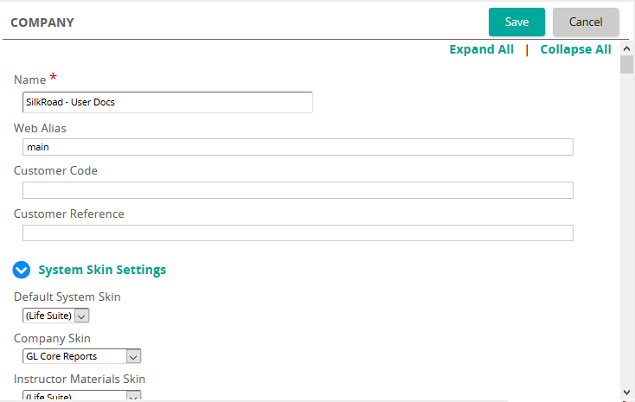
An administrator sets and maintains global company settings on the Company page.
Settings
Name: Type the name of your company.
Web Alias: The web alias name appears here.
System Skin Settings
Default System Skin: Select a specific skin to become the default system skin. The default system skin is the base skin used by Rival Learn when no other skin page is defined by either a company skin or materials skin. Rival Learn provides two interface options: Life Suite and Legacy.
Company Skin: Select a specific skin to become the company skin. The company skin is the skin used by Rival Learn whenever a default skin is identified.
Instructor Materials Skin: Select the default content object skin for training activity material attachments viewed from the Instructor My Teaching page.
Student Materials Skin: Select the default content object skin for training activity material attachments viewed by a student. This skin is used by Rival Learn whenever a student launches training activity material from their training page or from the catalog in the Student/Supervisor Portal.
User Interface Settings
Catalog Widget:: To display the catalog widget on the Student Portal dashboard, check this option. You can then choose to display recommended courses or popular courses. If you choose recommended courses, add them to the Course Catalog Item list and put them in the order you want.
User Interface Settings: User interface settings control various functions within the selected skin. You can turn settings on or off. The settings are shown in the following table.
- Timezone: The default time zone for a site is shown here. This is the company-wide default time zone setting that is used for training event scheduling and when viewing.
Note: Rival Learn administrators cannot change the time zone setting. Only Rival support staff can change the time zone setting. To request a change to this setting, contact Rival support.
Mastery Mark Default: Select a mark default to be used if no mastery mark is set for competencies, requirements, or content. in Learning Journeys or directly on an activity within a content object used in an eCourse.
Force End-User License Agreement (EULA) Acceptance: Select whether the EULA defined in the EULA Student skin page is displayed prior to students accessing content from their home page.
Concurrency Management Enabled: Select this check box to control whether Check-In/Check-Out function is enabled for content object authoring and media bank modification. Setting Concurrency Management to ON forces Check-In/Check-Out control when authoring content objects and modifying media objects. Only objects that are checked out can be modified. Only one user may modify a check-out object at a time. Ability to check-out an object is based on a combination of user privilege and check-out status.
Enable Multiple Report Windows:Select this check box to control the ability to open multiple report windows when viewing reports. Especially useful for viewing multiple reports for a single student in dynamic reports.
Contact Info
Email for Outages and Upgrades: Enter the email address(es) of people to contact when there are system outages and upgrades. Separate each address with a semicolon (;) to send to more than one email address or use your own distribution list.
Address Line 1-3: Enter the address of your organization.
City: Enter the city.
State/Province: Enter the state or province.
Country: Enter the country.
Zip/Postal Code: Enter the zip/postal code.
Telephone: Enter the telephone number.
Toll Free: If your organization has a toll free number, enter it.
Cellular: Enter a cellular (mobile) phone if applicable.
Fax: Enter a fax number.
Email: Enter an email address.
Billing Info
Type billing information for the company.
Support
Tech Support Name: Type the name of your company's technical support department. The value you enter appears in the Admin Help window.
Tech Support Phone: Type the phone number of your company's technical support department. The value you enter appears in the Admin Help window.
Tech Support Email: Type the email address of your company's technical support department. The value you enter appears in the Admin Help window.
Notification Settings
Default Email Format: The default email message format for all users in Rival Learn. Valid options are:
Enable Test Mode: Select this check box to turn on notification test mode. When turned on, recipient and sender addresses for all active notifications are replaced with test recipient and sender addresses so that notification messages can be tested and validated.
Test Mode Recipient Address: Enter the test mode recipient address for all active notifications
Test Mode Sender Address: Enter the test mode sender address for all active notifications.
Correspondence
Notification By: Select how notifications are sent. Options are internal, external, or internal+external.
Mail Prompt Options
Enable popup mail prompt for new messages: Select this check box to enable whether a popup reminder is used to notify users of new mail messages arriving for internal notifications and messages. Otherwise, leave unchecked.
Refresh rate: Enter the refresh rate for email, in minutes. The default is 1.
Miscellaneous
Personal Learning Journey Title: Type the default label used to describe Personal Learning Journey within student Personal Development Plan and Reports.
Enable Community Link: Select this check box to turn on internal mail/notifications or leave it unchecked to turn off internal mail/notifications.
Content
Content Workflow Stages: Use this section to set the content workflow to use when developing content in Rival Learn. Workflow stages are used in Rival Learn in content object properties. You can modify the workflow between Authoring (In Development), Staging (Content Review), or Library (Approved Content) and also create specific notifications for the content workflow.
Default Media Owner Workgroup: If you want to assign a default workgroup to new media after it is initially uploaded to the media bank, click to search for and select one. Otherwise, leave blank.
Training Activity Types: Click Add to add a training activity type.
Regional Settings
Default Language: Select the default language for Rival Learn.
Short Date: Select the format of the company date (short date) as it will appear in Rival Learn for the language specified in the Default Language field. Each language can have its own short date format.
Long Date: Select the format of the company date (long date) as it will appear in Rival Learn for the language specified in the Default Language field. Each language can have its own long date format.
Short Time: Select the format of the company time (short time) as it will appear in Rival Learn for the language specified in the Default Language field. Each language can have its own short time format.
Long Time: Select the format of the company time (long time) as it will appear in Rival Learn for the language specified in the Default Language field. Each language can have its own long time format.
Available Countries: Shows the countries available from selection lists in Rival Learn. Click Add to add new countries to the list.
Account Management
Account Identification Fields: Account identification fields are used to validate users when they request a password change. Select the specific fields to combine with the LoginCode that users will be required to enter to validate a password change. From the Available list, select one or more fields and move them to the Assigned list.
Account Verification Mode: Select the mode used to verify accounts. Select one of these options:
Number of Account Security Questions Users are required to Answer: Type the number of security questions a user is required to answer to verify account.
Account Security Questions Preview:: Click to preview the security questions available.
User Login Attempts before Lockout: Type the number of attempts. This controls how many failed attempts users have before they will be locked out of Rival Learn.
Force Profile Completion On FIRST Login:: Select this check box to force users to complete their profile prior to first login.
Force Profile Completion On NEXT Login: Select one of the following:
Password Management
Minimum Password Length: Type the minimal accepted string length for all user passwords.
Must contain at least one upper and lower case character: To require that a password contain at least one upper and lowercase character, select this check box. Otherwise, leave unchecked.
Must contain at least one numeric character (0-9): To require that a password contain at least once numeric character, select this check box. Otherwise, leave unchecked.
Must contain one or more of the following special characters: To specify that a password contain one or more special characters, type those special characters in this text box. Otherwise, leave blank to not require specific special characters.
Enforce Password History: Type the number of passwords (0 to 24) Rival Learn remembers when users are required to change their password.
Password Expiration Period: Type the number of days passwords are valid (defaults to 0, indefinite).
Password Expiration Warning Period: Type the number of days prior to expiration that users will receive a warning to change their password on login.
Force Password Change on FIRST Login: Select this check box to force users to change their password prior to first login.
Force Password Change On NEXT Login: Select one of the following:
User Session Management
Enable Auto Logout Feature: Select this check box to automatically log users out of Rival Learn when session time expires. Otherwise, leave unchecked.
Session Expiration: Type the number of minutes the session will expire without activity. The minimum value you can enter is 5 minutes.
Reporting
Report Logo: To link a company logo to Rival Learn reports, click to search for and upload a logo from the Media/Asset Bank. For best results, the recommended image format and size is a jpeg file that is 165 pixels X 65 pixels.
Report Title Text - Level 3 Text: Select each of these report levels to set their respective colors.
View Sample: Click this button to view a sample of how the report will look.
Reset Defaults: Click this button to reset the custom report settings back to the original defaults.
Course Catalog Management
Enable Ecommerce: Select this check box to enable Ecommerce. If enabled, student users can buy course catalog items from the course catalog at the price indicated.
Partner: Enter the name of your Ecommerce Paypal partner.
Merchant: Enter the merchant who handles your Paypal transactions.
User: Enter the user account associated with Ecommerce.
Processing Mode: Select one of the following:
External Authentication
Name: Displays the name of the external authentication link as set up by an administrator.
Enabled: Select this check box to enable (turn on) external authentication.
Link Text: Link text helps students identify which credentials they will use to log into Rival Learn. For example, if Link Text is set to "Your Network ID", the instruction on the login page is "Log in using: Your Network ID".
Content recovered from the legacy Help Center on 2026-09-14 and not yet reviewed against the current product. Source: https://srt-learning-help.silkroad.com/#/home/18965/en/std